Don’t panic when Windows 10 is no longer supported – options including forced Windows 11 installation
Stephen Davidson (Davo esq)
By now most people will be aware that Windows 10 support ends 14th Oct, 2025. This doesn’t mean that Windows 10 will stop working leaving you with a dead computer, it just means that Microsoft will no longer issue feature updates nor security updates. You can still surf the Internet, read email, etc but you increasingly leave yourself open to hackers by exploiting yet to be undiscovered security holes.
So, what to do. If your computer hardware supports running Windows 11, upgrading to it would probably be the best path. The requirements for Windows 11 the requirements that Microsoft have forced on us are –
- Processor – 1 gigahertz (GHz) or faster with 2 or more cores on a compatible 64-bit processor or System on a Chip (SoC). Also, Intel Gen 8 or later CPU’s, AMD Ryzen Zen 2 or later CPU’s.
- RAM – 4 gigabytes (GB)
- Storage – 64 GB or larger storage device
- System firmware – UEFI, Secure Boot capable.
- TPM – Trusted Platform Module (TPM) version 2.0
- Graphics card – Compatible with DirectX 12 or later with WDDM 2.0 driver.
- Display – High definition (720p) display that is greater than 9” diagonally, 8 bits per color channel.
- Internet connection and Microsoft account – Windows 11 Pro for personal use and Windows 11 Home require internet connectivity and a Microsoft account during initial device setup.
To see if your computer meets the requirements for Windows 11.
Check Windows Updates for any information, or, the easiest way is with the PC Health Check app. Download the PC Health Check app and install (https://aka.ms/GetPCHealthCheckApp). Look in your start menu for PC Health Check and click on it to run it, or, press Windows logo key + S or select Search, type pc health check, and select PC Health Check from the list of results. Select Check now.
Should then indicate if requirements are met or list which one/s aren’t.
The biggest problem that arises is that there are many computers that run Windows 10 very well that are very capable of running Windows 11, except they lack TPM 2.0 or the CPU is earlier than Intel Gen 8 CPU’s or earlier than AMD Ryzen Zen 2.
Microsoft wants people to dump these Windows 11 “incompatible” computers and rush out and buy new Win 11 compatible computers. As well as being expensive for people in this present cost of living crisis, it means that millions of computers may be heading for the scrap heap, unnecessarily.
What options are available?
Some of the options available are –
- Consider switching to another OS to avoid security risks. Eg Linux and ChromeOS Flex are alternative options. David Hatton recently ran a Zoom online demonstration on how easy it is to install Linux Mint Cinnamon that many people attended.
- You could pay for micropatching from a third party for Windows 10. A company called 0Patch (https://0patch.com/index.html) delivers miniature patches of code (“micropatches”) to computers and other devices worldwide in order to fix software vulnerabilities in various, even closed source, products. With 0patch, there are no reboots or downtime when patching and no fear that a huge official update will break production. 0patch does not replace executable files or modify them in any way. It corrects them only in memory, which can be done without relaunching them.
- Pay for one-year Extended Security Updates (ESU) from Microsoft. For US$30 will help protect your Windows 10 device, but only for 1 year delaying the inevitable. Enrolment for this programme will open in 2025. ESU is a paid programme that will entitle enrolled PCs to receive Critical and Important security updates after support for Windows 10 ends. The programme will provide Critical and Important security updates but will not provide other types of updates or technical support.
- Salvage PC parts for future builds, repurpose them as a NAS server, or upgrade components for better performance
Installing/upgrading to Windows 11 on “Incompatible” computers.
If considering switching to Windows 11, but hardware compatibility is an issue with Windows 11, you can force an install. Following are two different methods that can be used to upgrade “incompatible” computers to Windows 11 that I have used and found to work.
The first method involves using a single command line “switch” with the setup.exe file in the Windows 11 24H2 ISO. The second method involves using a free program called Rufus to patch/modify Windows 11 to bypass a variety of Microsoft’s requirements.
Caution in upgrading (danger Will Robinson), which English version was installed previously?
Before upgrading your “incompatible” computer, you need to ascertain which version of Windows 10 English was installed, US or UK (International). There have been reports of people upgrading using the wrong English version have not had the option to keep installed Apps, settings or documents, or these being wiped and lost.
We need to delve into the registry to find out.
The registry value to lookup is… HKEY_LOCAL_MACHINE\SYSTEM\CurrentControlSet\Control\Nls\Language\InstallLanguage which returns a four digit language code.
You can check which language is your original in Registry entry by –
- Hit Windows key+R keys and type the word regedit . Click on Yes to continue.
- Follow the path
HKEY_LOCAL_MACHINE\SYSTEM\CurrentControlSet\Control\Nls\Language\InstallLanguage To the right under the Data heading is the language code.
US English 0409
UK English 0809 same as English International
Make a note which code and English version you have installed.
Download the Windows 11 ISO file.
- Go to the Windows 11 Download page (aka.ms/DownloadWindows11) and choose the option at the bottom of the page, “Download Windows 11 Disk Image (ISO) for x64 devices.”
- Click on the drop down box “Select Download” and choose “Windows 11 (multi-edition Iso for x64 Devices)”.
- Click on the “Download Now” button.
- Under the “Select the product language” heading click on the “Choose one” drop down box and click on either the English (United States) or English International (which is the same as English UK), depending which English version you determined is currently installed on your Windows 10 computer. Click on “Confirm” button.
- Click on the “64-bit download” button and note where you save the ISO to.
First method – Using the single command line “switch” method.
Using the downloaded Windows 11 ISO, do this –
- Using Windows Explorer either double-click the Windows 11 ISO file, or, right click on the downloaded Windows 11 ISO file and choose the Mount option. This will open the ISO file as a virtual drive. Take note of the driver letter that is assigned.
- Click on the Start button (bottom left of your task bar). Type cmd in the search box. Run the cmd as an administrator by right clicking on cmd and choose “Run as administrator”.
- Navigate to the drive letter that was assigned from step 2 by typing in the drive letter (eg F: ) at the cmd prompt and pressing the return key, where the setup.exe file is in the ISO.
- If you type the dir command at the prompt, you should see the setup.exe file listed.
- At the command prompt type setup.exe /product server and press enter to begin the install. Although it states a Server Edition is being installed, the US or International version actually is being installed.
From there you go through the usual steps to upgrade. Somewhere along the procedure you should be given the option to Keep all Apps, documents and settings if you want to.
If this does not work then it is time to try the Second method listed next.
Second method – Using Rufus to patch Windows 11 to bypass Microsoft’s requirements (computers with UEFI).
You can force an install of Windows 11 even if your device’s hardware compatibility is an issue eg no TPM, unsupported CPU, not enough RAM, etc using the free tool, Rufus. The following is when your computer has a UEFI BIOS (which is most modern computers in the last 6 to 8 years).
- Plug in your USB stick that is at least 8GB in size.
- Download Rufus from Github.com ( https://github.com/pbatard/rufus/). See the link on the right, middle of the page under “Releases” heading to get access to the latest version (currently version 4.7).

- Once downloaded, open Rufus (it is a portable program, does not need installing).
- Click on the Select button, navigate to your ISO file and add it.

- From the Image option, leave as “Standard Windows Installation” and the others as is. Click on Start at the bottom.

- In the next dialog box, place a tick for “Remove requirement for 4GB+ RAM, Secure boot and TPM 2.0”
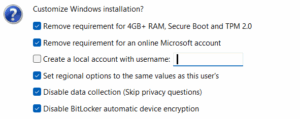
- You can choose whichever of the other options suit you.
- “Remove requirement for online Microsoft Account” enables you to create a Local Account instead of the Microsoft account.
- “Create a local account with username” enables you to name your user account.
- “Set regional options …” will set your account to whatever you currently have if you are doing an inline update.
- “Disable data collection …” is good to tick unless you want to enable/disable some of the options manually.
- “Disable Bitlocker…” is a good idea as some people online have reported that BitLocker encryption has been automatically enabled for them (when they do not want, nor need it).
Click OK when you’ve made your decision. You’ll be warned all data on your USB stick will be destroyed as it will be formatted during creation and go make a cuppa unless you like watching paint dry .
When finished you can close Rufus, use Windows Explorer to open the USB drive and double click on the setup.exe file to begin upgrading to Windows 11 24H2. You should be able to choose to keep your “Apps, documents and settings” at some stage if wanted or you can elect to completely erase the drive.
Second method Addenum – Using Rufus to patch Windows 11 to bypass Microsoft’s requirements on really old BIOS computers.
The above Second method works beautifully for those computers that have a UEFI BIOS, which means most computers in the last 8 odd years. You can also install/upgrade some computers to Windows 11 24H2 that have the old BIOS, as long as the CPU has certain instructions.
Old Intel CPU’s must have SSE4.2 (Streaming SIMD Extensions 4.2) and POPCNT (Population Count) while AMD CPU’s must have SSE4A (for some AMD CPUs, SSE4A implies the necessary instructions) to be able to upgrade/install Windows 11 24H2. The impact on older CPUs is this new requirement primarily affects very old CPUs, typically those from before the Intel Nehalem (Core i-series first generation) and AMD Phenom II era (roughly pre-2008-2009). If your CPU doesn’t have these CPU instructions, you cannot install Windows 11 24H2. There is no workaround. I have an old Phenom II X4 955 that ran Windows 10 beautifully that I have installed Windows 11 23H2 onto, but it will not update to 24H2 as it does not have SSE4A. Bumma!
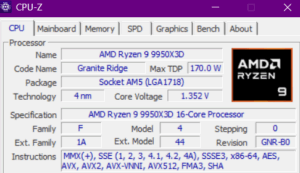
To check if your CPU supports 24H2, download and install CPU-Z. This is a popular freeware tool. Download, install, and run it. On the “CPU” tab, look under the “Instructions” section. You should see “SSE4.2” listed there for Intel CPU’s or SSE4A for AMD CPU’s. The picture below shows this 9950X3D CPU has all the required CPU instructions for 24H2.
You could also visit Intel’s or AMD’s official website and search for your specific CPU model. Look for its specifications, particularly under “Instruction Set Extensions” (Intel) or similar sections. You’ll need to look for SSE4.2 or SSE4A.
If your old CPU with a BIOS has got SSE4.2 or SSE4A instructions, you can still install 24H2 using Rufus similar to the instructions listed previously.
Repeat steps 1 to 4 from above.
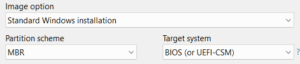
In step 5 from Image option, leave as “Standard Windows Installation” but under Partition Scheme change it to “MBR” with Target System changed to “BIOS (or UEFI-CSM)”. Click on Start at the bottom.
Follow steps 6 onwards to complete installation/upgrading.
Hopefully this will save you time and money being able to keep your computer running Windows for a while longer until Microsoft decides to really stuff us up.