East SIG Report October 2020
21st November 2020
Neil Muller
East SIG meeting host Paul Woolard opened the October virtual meeting with Frank Maher as the Zoom host. The meeting then commenced with George Skarbek presenting Q&A.
- I’ve recently had my Melbourne PC email successfully moved to Google G-Suite by the Office 365 Translation Team. I use Microsoft Mail and have been unable to move my Melbourne PC mail from Google G-Suite to Microsoft Mail. Another member mentioned he had the same problem. However he has not yet had his Melbourne PC email moved to G-Suite so thought the problem the member had may not be due to translation to G-Suite.
- George was unable to assist with this problem and there were no further questions.
The night’s first presentation was on “Virtual Backgrounds on Zoom” by Dave Botherway.
Zoom is constantly being updated so needs to be checked regularly for updates. The updates are not automatic so will need to be performed manually. Open Zoom from the Windows start menu and the Zoom home page as shown in Figure 1 opens.
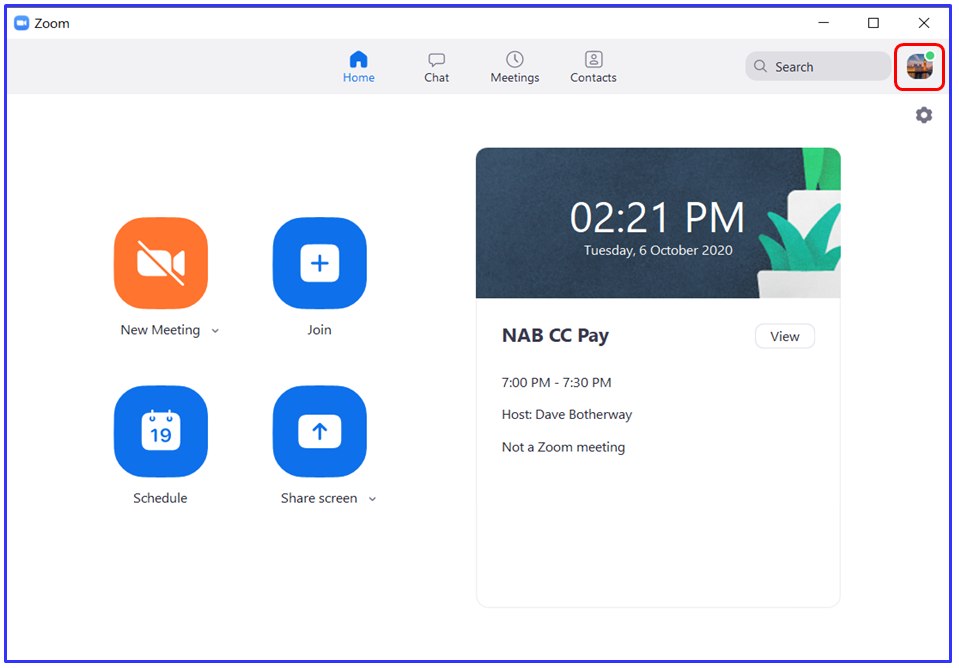
Figure 1 –Zoom’s Home Window
Click on the user’s avatar at the top right corner of Zoom’s home screen and an Options window appears. (Figure 2) Select “Check for updates” in this window and if an update is available the “Zoom Update” window appears. This window gives the new version number along with the current installed version and version changes. From the “Zoom Update” window select “Update” and the progress of the update is shown as can be seen in Figure 2.
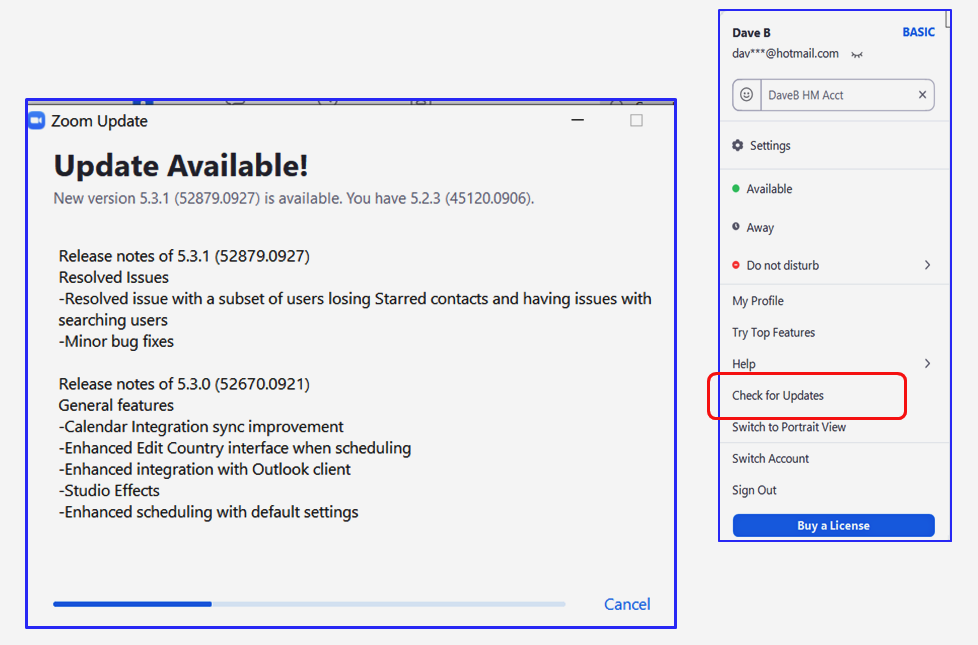
Figure 2 –Zoom’s Options & Update Windows
When attending a Zoom meeting the user’s webcam sends out the video feed to all those attending. Often to save system resources or to leave a meeting briefly, the video may be turned off. When this is done a blank screen is displayed in place of the video feed. By updating the user’s profile image, a static picture can be displayed instead of showing a blank screen.
To change a user’s default picture, select “Settings” from either the Options window (Figure 2) or from the cog wheel below the user’s avatar (Figure 1). From the Settings window select “Profile” then “Edit my Profile”. From here select a picture to use as your user profile.
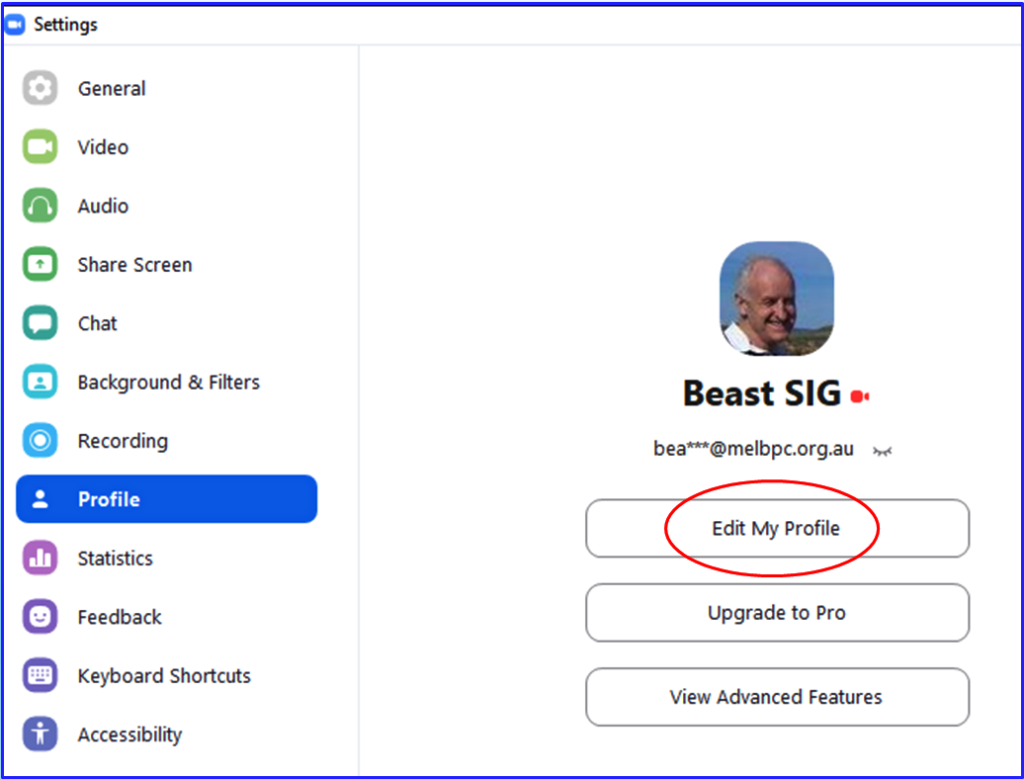
Figure 3 –Zoom’s Setting Window
Using a Virtual Background in Zoom allows the user to display an image or video as a background to their image. This feature works best with a physical green screen and with uniform lighting. A contrasting background allows Zoom to detect the difference between the user and their background.
Virtual backgrounds can be chosen either from the Setting window above (Figure 3) by selecting “Backgrounds & Filters” (Figure 4) or from the Zoom toolbar by clicking on the up arrow besides video icon. (Figure 5)
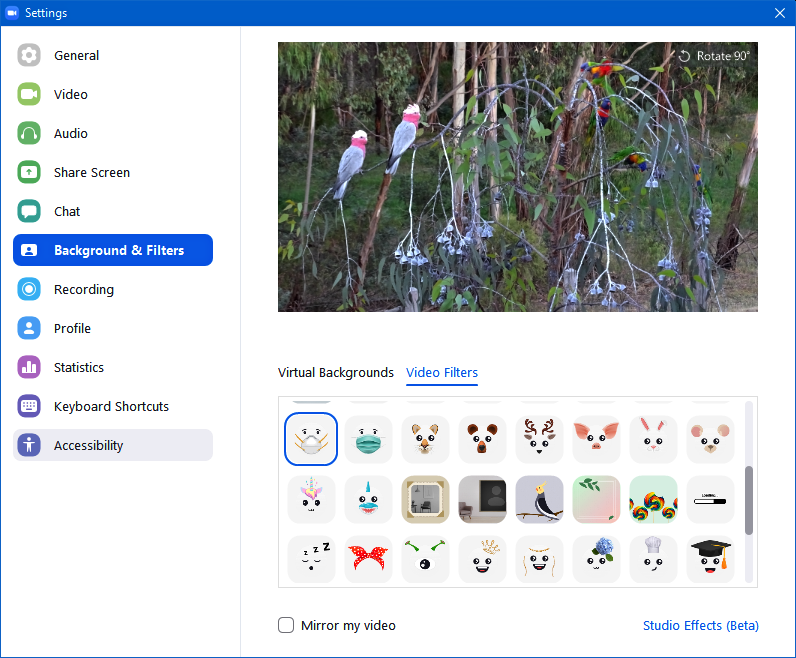
Figure 4 – Background & Filters
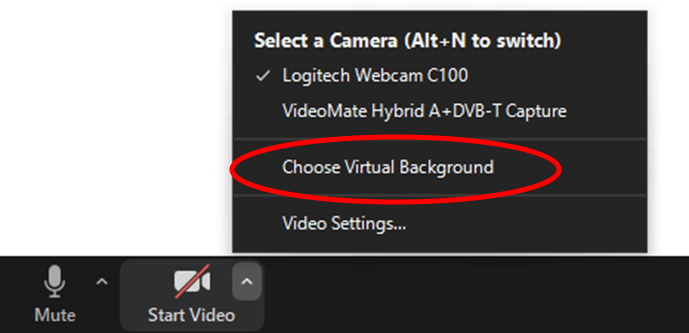
Figure 5 –Zoom Toolbar, “Choose Virtual Background”
The following items need to be considered when planning to use a Virtual Background
- Considerable image processing is involved separating the user from the background
- A reasonably fast CPU is needed. Dave recommends at least an Intel i5 or equivalent AMD
- A background that is a uniform colour or “green screen” is desirable
- Default pictures are available but it’s easy to add your own
- Use contrasting colour clothing
- Select a background that isn’t a distraction
- If the CPU allows you can add your own video background
After selecting “Backgrounds & Filters” from the “Settings” window, 2 tabs appear under the video feed where either Virtual Backgrounds or Video Filters (Figures 4 & 6) can be selected. Under the Virtual Backgrounds tab are a number of default backgrounds that are available to use, or you can add your own background picture or video by clicking on the plus icon (+) located above the scroll bar on the right. .
The Video Filters tab offers filters that can change your video appearance. In addition there are a multiple amusing effects that can be added to your video image, such as hats, glasses and even face masks. These latter filters move with the user’s image as if they are attached to it.
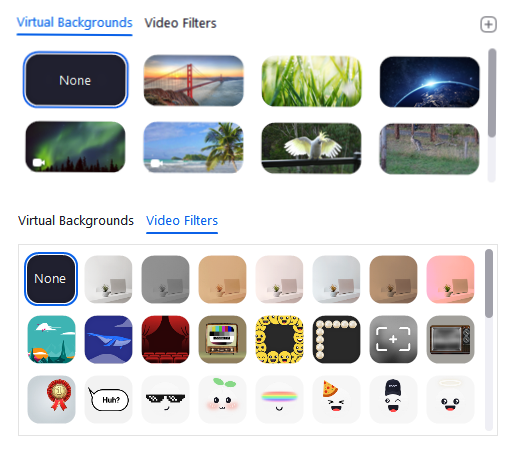
Figure 6 –Combined “Virtual Backgrounds” & “Video Filters” Dialogue panels
At the conclusion of his presentation, Dave gave members the opportunity to investigate Virtual backgrounds and filters. Much entertainment was had by audience members trying the various filters including face masks, hats, eye brows, glasses together with experimenting with the various virtual backgrounds available.
At the start of his presentation, Dave recommended updating Zoom regularly. Changes to the way “View” is displayed and the numbers of emoji’s now available, are 2 of the changes that have been observed since last month’s meeting report on Zoom. These changes are depicted in Figure 7 below.
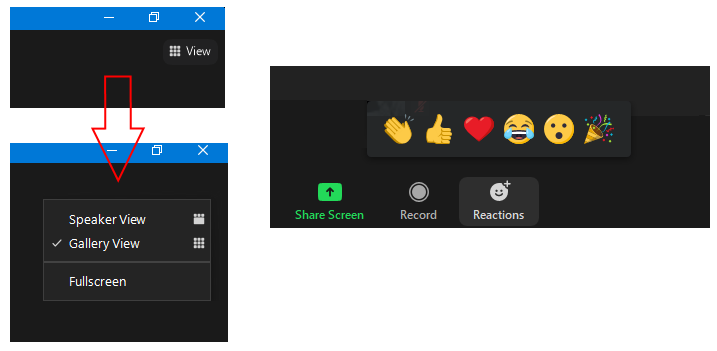
Figure 7 –New “View” & Emoji’s
Stewart Bedford followed Dave with a presentation titled “My experience setting up and using a Linux-Windows Dual Boot Operating System”. As a long term Windows user Stewart opted for a dual boot Linux setup, more out of curiosity than any real need. Linux could have been run as a virtual machine, but a dual boot arrangement was chosen partly due to its lower system overheads.
Stuart’s dual boot setup comprised Windows 10 running on one Solid State Drive (SSD) and Linux Mint, Cinnamon edition 19.3 running on another SSD. Normally a dual boot would have both operating systems (OS’s) on the same SSD or HDD. Stuart chose a separate SSD for Linux to avoid using up space on the Windows SSD and because SSD were now more affordable than when the Windows SSD was purchased. To make the transition to Linux easier, the Cinnamon distro of Linux Mint was selected due to its close resemblance to Windows 10.
Having installed the second SSD in his computer, the next step in the process is to download a Linux Mint ISO file from https://www.linuxmint.com/download.php. The Linux Mint ISO file has the file extension .iso and is an exact operating system image of the Linux file system. Once the ISO file is downloaded it needs to be flashed to a USB flash drive or written to a DVD. Linux can then run from the USB flash drive or DVD as a “live distro” or be installed as in Stuart’s case on the second SSD.
To create a bootable USB flash drive Stuart used a program called Etcher. Etcher converts the downloaded ISO file to a bootable USB flash drive. After running Etcher the next step is to restart the computer with the flash drive in a USB slot. When the computer boots in reads the USB flash drive and the Linux desktop loads (Figure 8). If the computer boots to Windows 10 it will be necessary to go into the BIOS and change the boot order so that the USB drive rather than the Windows 10 SSD boots first.
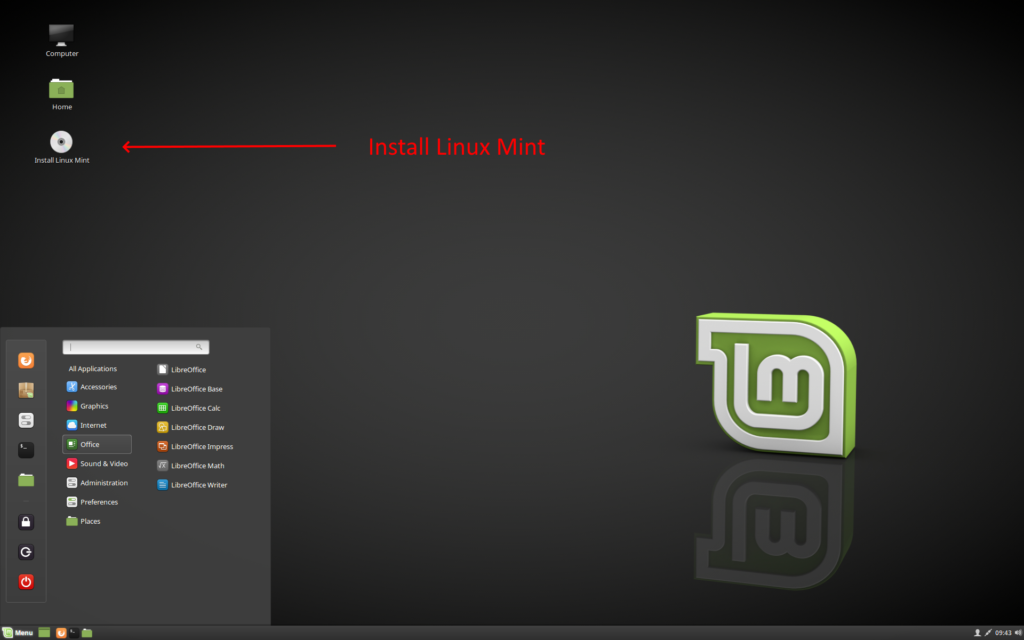
Figure 8 –Linux Mint Desktop Screen
From the Linux desktop shown in Figure 8, Linux can be run either as a “live distro” from the flash drive or installed on the second SSD. Stuart selected the install option and Linux immediately identifies that Windows 10 is already installed and offers a number of different installation options.
Wanting to run Linux Mint from the second SSD Stuart selected the first option “Install Linux Mint alongside them”. The “them” refers to the other OS’s the Linux installation found (i.e. Windows 10). The remainder of the installation was quick and went very smoothly, with only requiring time zone, language and password to be entered along the way. All hardware was identified and installed correctly, which came as a pleasant surprise to Stuart. When the computer now starts it boots to a menu offering the choice of either Linux Mint or Windows 10. The top entry in the menu is Linux Mint with Windows 10 at the bottom of the menu. Selecting either menu option causes the computer to boot to that operating system. A similar Dual Boot menu to the one Stuart sees is shown in Figure 9.
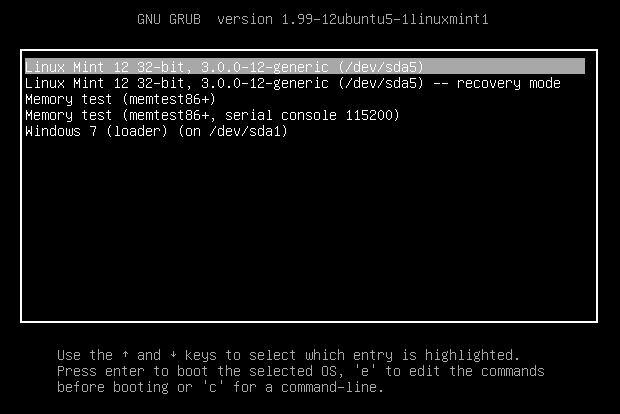
Figure 9 – Dual Boot menu for Linux Mint 12
Stuart has been a Linux user for 2 years, but this is the first instance he’s used Linux in a dual boot arrangement. From his experience to date, Stuart went on to describe the positives and negatives he’s found using both Linux Mint and Windows 10.
Advantages of Linux over Windows
- Linux in free while Windows is not
- Installation was simple and relatively quick.
- Installation identified all hardware correctly
- A hard disk running a Linux OS can be moved to another computer and will work straight away. A hard drive with a Windows OS (OEM or Full licence) in the majority of cases cannot be moved to another PC and work straight away.
- There are numerous versions of Linux that will run on lower powered or older computers that may struggle to run Windows 10. e.g. 700 MHz processor with 512 MB RAM and 5GB hard drive space on a VGA monitor (1024 x 768)
- Linux distros come preloaded with most of the software the majority of users need. i.e. an Office suite, Firefox, Thunderbird for email, GIMP as a replacement for Photoshop & many other programs.
- Updates can be controlled and set to update automatically in the background while working
- Generally there is no need to reboot after a Linux update
- Linux is less vulnerable to viruses due to its small market share.
- A Linux “live distro” can be used to boot a dead Windows computer to problem solve.
Advantages of Windows over Linux:
- User familiarity with Windows
- Larger variety of free and paid software is available
- Windows is better for gaming
- Most users with a moderate skills can use the Windows command line
- Popular programs such as Photoshop, Lightroom and Video editing software are not available in Linux.
Followed Stuart’s presentation we looked at “Advanced Google Searching”. Paul Woolard commenced by asking those present who uses Google to search the Internet. Most used Google and were unconcerned that Google tracks their search terms in order to target them with more relevant advertisements. One member commented that it was better to see advertisements that may be of interest, rather than random irrelevant ones. A small number present used Bing and others more concerned about their privacy used DuckDuckGo for internet searches.
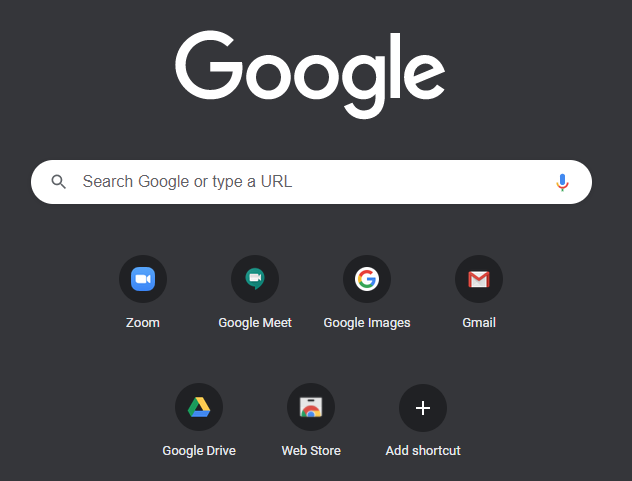
Figure 10 – Google Search Box
Most Google users simply enter their search terms into the search bar. However by using a few simple search techniques, it’s possible to narrow down the search to give more accurate results. Some of the more useful of the techniques Paul mentioned in his presentation are included below.
- To search for an exact phrase, include the phrase in quotation marks
g. “notebook computer” - To search for an exact phase when a word is unknown use an asteriskfor that word
g. “Mary had a * lamb” - To search for items that may be known by 2 different names, use OR(in capitals) between the names
g. “miniature OR small” - To exclude a word from a search add a minus sign(no gap) in front of the word.
g. “notebook computer” -HP - To include a word in a search use AND(in capitals).
g. “laser printer” AND colour - To search within a website use site:
g. site:Melbpc.org.au PCupdate - To find the definition of a word use define:
g. define: megabyte - To translate words from one language to another use translate
g. translate “Mary had a little lamb” to French. - Google can also be used for arithmetic calculations to Add, Subtract, Multiple, Divide, Percentage and Power.
g. 1024+456, 1024-456, 1024*456, 1024/456, 45% of 456 & 6^4.
The term “Advanced search techniques” is a little misleading as most would find the techniques presented are simple and easy to remember. For those wishing to further investigate Google searching Paul has provided links to 3 web pages below.
37 Advanced Google Search Tips for Smarter Searching
https://www.coforge.com/blog/advanced-google-search-tips
How to Use Advanced Google Search Commands
https://www.lifewire.com/advanced-google-search-3482174
Google Tricks That Will Change the Way You Search
https://time.com/4116259/google-search-2/
To conclude this topic George Skarbek suggested members should consider using Google’s “Advanced Search”. To display Google’s “Advanced Search” window, select “settings” then “Advanced Search” from the Google home page. (Figure 11). Alternatively enter “advanced search” in the standard Google search box.
The “Advanced Search” window displays rows of search boxes where the different type of search queries can be entered. The search terms used in these boxes have been mentioned earlier but don’t need to be remembered because examples are shown to the right of each box. As the graphic below (Figure 12) is a little hard to read, the title of each search boxes is listed below.
- Box 1 – All these words e. type in all important words
- Box 2 – This exact word or phrase e. quotation marks
- Box 3 – Any of these words e. OR
- Box 4 – None of these words e. –
- Box 5 – Numbers ranging from e. place 2 full stops between the numbers
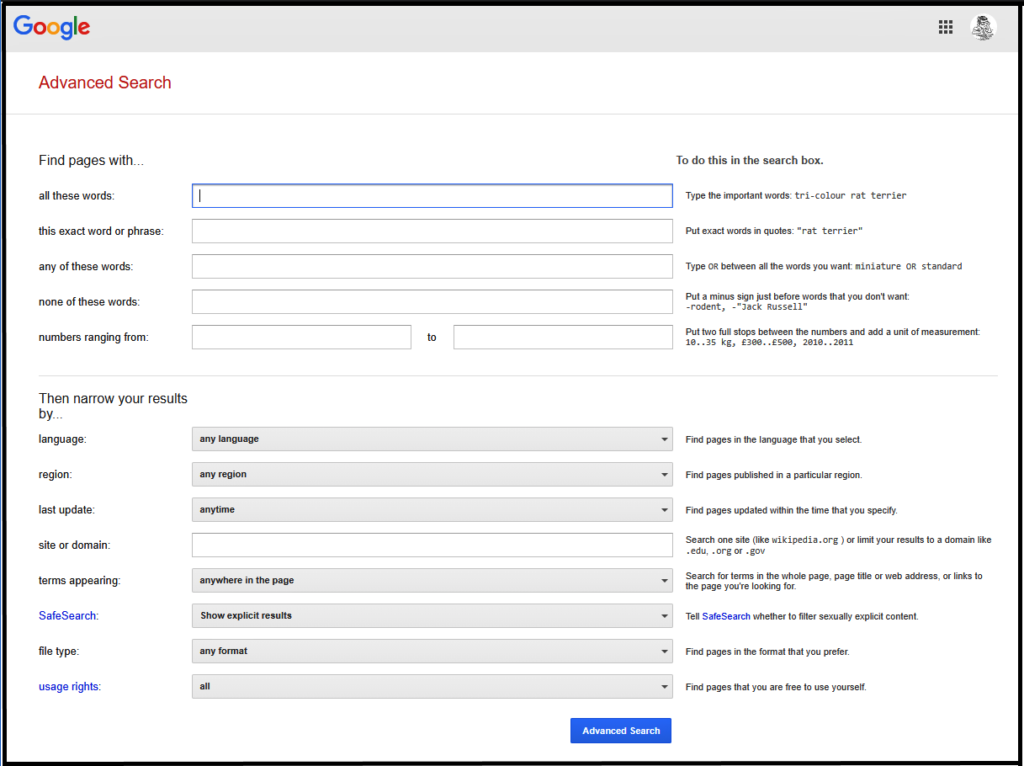
Figure 11 – Google Advanced Search Window
After entering search terms in the 5 search boxes above, searches can then be narrowed further according to language, region, last update, site or domain, terms appearing, safe search, file type, and usage rights in the “narrow your results by” section below. George mentioned how useful he finds the “last update” option when for example searching for “recent windows problems”.
A tip from an audience member suggested using startpage.com for anonymous internet searching. Startpage uses Google’s search engine, but acts much like a VPN yielding search results that appear to Google as originating from Startpage. Therefore Startpage can be viewed as an intermediary with search results that are anonymous and encrypted.
The meeting concluded with a general discussion and testing of screen sharing using Zoom. The reason for this was to investigate why the audience found text from one of the night’s presentations at times unreadable. It was eventually found that the presenter had ticked the “Optimise Screen sharing for video clip” box when sharing webpages from his screen. This discussion & testing will prove very worthwhile when Screen sharing is used in future meetings. The conclusion, only tick “Optimise Screen sharing for video clip” when showing videos, then untick when the video is completed.
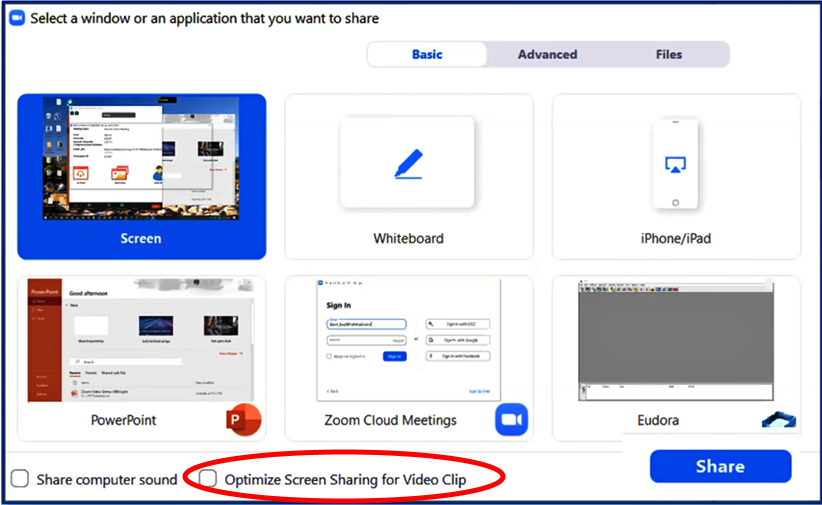
Figure 12 – Zoom Screen Sharing Window