Smart Devices In The Home
2nd December 2019
Phil Sorrentino, The Computer Club, Florida
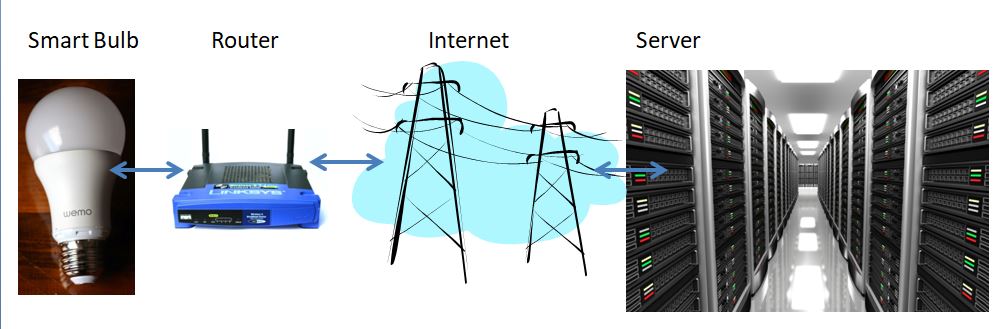
There are a whole host of smart devices available for use in the home now. Some of the most basic and least expensive ones are smart bulbs, smart plugs and smart cameras. (Yes, I know cameras can be expensive, but there are some fairly inexpensive indoor-only cameras.) First of all, what makes these devices smart? Well as I have alluded to in previous articles, it’s all about Client – Server technology. The devices have some limited intelligence in them. Read “intelligence” as basic processing power, downloadable firmware, and wi-fi electronics. This allows them to be able to communicate with a local wi-fi router, which in turn allows them to access the internet. Once they can access the internet, they can take advantage of the servers on the internet (sometimes referred to as “in the cloud”). The intelligence in the accessed server is where all the magic happens. Here read “intelligence” as very fast, very powerful, server computers capable of handling millions of requests for service per second. So it’s the combination of the smart device, the internet, and the server that really makes the smart device: smart.
Once you have your smart device ready for installation, it is the App on your smartphone that takes over and steps you through the installation process. (Yes, a smartphone is required for the installation, either Android or Apple.) The App that you will use for installation will be the App from the specific smart device manufacturer. So for example, if you have a TP-Link smart bulb, you would have to get the TP-Link App for your smartphone. In this example that would be the “Kasa” App. Similarly, if you have a Wyze smart bulb you would use the Wyze App for the installation. These Apps are free and are intended to work with the servers from the specific manufacturer. (So just as an aside, think about this. If the company that operates the server, the smart device manufacturer, goes under and the server goes away, your smart device will no longer be smart. The bulb may not even be able to be turned on if there is no server to command it to turn on.)
The installation process is usually pretty easy; after all, it’s the App that is doing all the work. The first thing you have to do is get the device ready for installation. The App will usually start this by having you select something like “add a device,” or “add a product”, or maybe you just have to select the “+” on the screen (as found on the Kasa App) to add a device. You will have to let the App know what type of device you are adding. This is usually done by just selecting the device type from a list of device types manufactured by that specific manufacturer. Once the device type is selected, you are ready to go into the setup mode. The App will give you instructions for getting the device into the “Setup” mode. On a smart plug with a push-button switch it is really easy because pushing the button as directed by the App will get the smart plug ready for installation. With a smart bulb, usually you quickly turn the power on and off maybe three times and the smart bulb goes into the Setup mode. You will know the device is in setup mode when whatever you were watching changes. With a smart bulb, the light may start to pulsate slowly, with a smart plug, the small light on it may blink or change color. Once the device is in the setup mode, it will need to know the name of your wi-fi network and the password for that network. (Note: some devices only support 2.4 GHz networks only; not 5 GHz networks.) You may have to use your “Settings App” on the smartphone during the setup; just follow the directions from the App. Once you enter the wi-fi network name and the network password you may see a timer count down for a few seconds till the installation is complete. Finally you will be asked to name the smart device; something like “desk light” or “bedroom plug”. (Keep in mind that each manufacturer’s App will be a little different, this is just a general example.) The installation may seem complex but after you have done it once or twice it will probably become automatic. However, you might want to keep those instructions that you get with the device in a safe, convenient, place because you might have to go through the whole process again. (Before I lose the instructions, I scan them into a file and place the file in a “Home Automation” folder so I can review the directions when I have to do another installation. This was recently necessary when I changed my router and the new wi-fi network had a new name and new password. This forced me to reinstall every device that used the house wi-fi. At the time, I had 7 smart devices that had to be reinstalled.) So now with the smart device installed you can control it from your smartphone App. Typically, you can turn it on and off and maybe even set up a schedule.
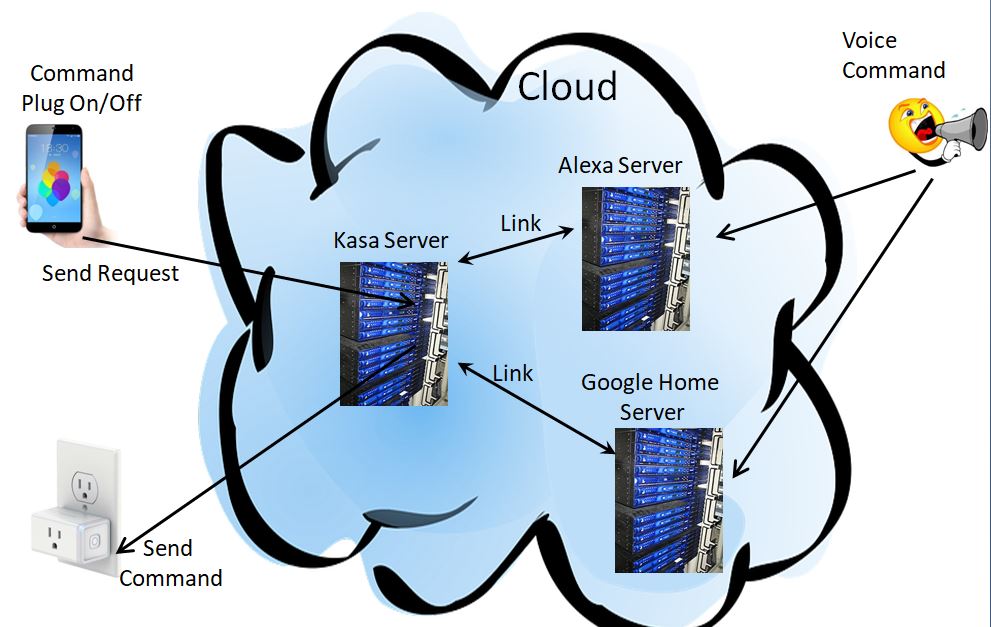
Once the device is installed and working, it’s time to move on to voice control. Voice control is supported by Amazon’s Alexa and Google’s Google Home. You can use either of these or both. Amazon calls the link between Alexa and smart devices “skills.” Google Home refers to them as links. In either case you need to have the appropriate App on your smartphone; the “Amazon Alexa” App for Alexa, and the “Home” App for Google Home. Again, the Apps are free and available for Android and Apple. Once you have the appropriate App, you just have to follow the instructions to link your smart device. Typically you will have to select the type of device and the device manufacturer. On Alexa this is started by selecting the “+” on the “Devices” screen and then selecting “Add device,” and then the type of device, and then selecting the manufacturer of your device from a list of manufacturers. To make sure you are linking “your Alexa” to “your smart device,” the App will require the Username and Password for the manufacturer of your smart device. (So, as a general rule, make sure you know the Usernames and Passwords for all of the manufacturers of the smart devices that you use.) Once you have authenticated yourself with your Username and Password, a link will be made between the Alexa server and the smart device manufacturer’s server. And now you can control the smart device, at least to the extent that the skills allow, by voice control. Now enjoy the feeling of power.