Neil Muller
Host Dave Botherway opened the March meeting again presented via Zoom. After welcoming members, the meeting commenced with George Skarbek presenting Q&A.
With no questions forthcoming, George proceeded to give the first presentation of the night. The presentation, “What New Monitor to Buy?” covers the process George went through when selecting his current computer monitor.
For those wishing to replace an old HD 24 or 27-inch monitor, then bigger is usually better. A larger monitor will significantly improve your productivity. Two documents are easily viewed side by side and scrolling is reduced if working on a large spreadsheet. For those interested in photography, a larger screen enables more detail of a photo to be displayed. In addition, when using editing software such as Photoshop or Lightroom, more tools are visible, which again reduces the need for scrolling.
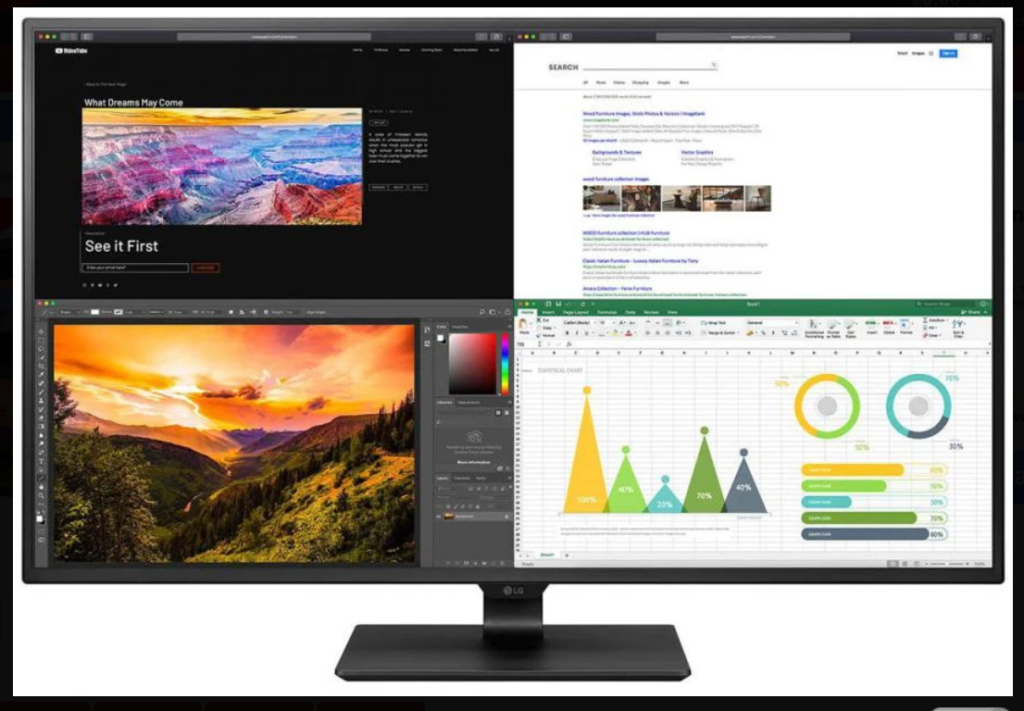
Figure1 – Wide screen monitor displaying multiple apps.
There are some disadvantages of larger screens. The screen will need more room on a desk and if the screen is too large you may find it tiring from moving your head from side to side. Larger screens are also more expensive.
Screen resolution is probably the most important factors to consider. When George selected his current monitor his first thought was to opt for a monitor with 4K (3840 x 2160 pixel) resolution. When viewing a 4K monitor prior to purchase, he found the small font size in Windows Explorer and other menus too small for his eyesight. He therefore selected a 32-inch monitor with 2560 x 1440 resolution. This monitor roughly equates to 3K resolution and was “very noticeably better” than his full HD monitor. Now after 3 years use, George still has no regrets that the purchase was the correct one.
To obtain the best image quality the monitor needs to be viewed at its native resolution. George noted that if he reduced the resolution of a 4K monitor to 2560 x 1440 resolution, (i.e. the resolution of the monitor he purchased), the resulting image would not be displayed as clearly. George therefore recommended viewing monitors before purchase and let your eyes decide what resolution is best for you.
If the monitor is to be used for photography, colour Gamut or the monitor’s ability to replicate the RGB colour sent from the graphics card, is another important factor to consider. The standard for RGB space is shown as sRGB and should typically be at 99%. If the specifications for a monitor have sRGB below 99% or does not record a sRGB score, it should be avoided if being used for photography.
For those not interested in photography, frame rate and refresh rate may be more important factors to consider. Refresh rate is the number of times a monitor’s display is refreshed and is expressed as hertz or Hz. 60Hz is a minimum value for normal use. For users interested in gaming, a high frame rate or frames per second (fps) is important. The frame rate is determined by the graphics card and CPU. For photography and watching videos, 30 fps is satisfactory.
Often a monitor will be purchased to connect to a Laptop computer. If a laptop with a 1920 x 1080 (full HD) pixel resolution is connected to say a 4K monitor, the upscaled image will still be the same HD image. The quality of that image will depend to some extent on the ability for that monitor to upscale the image well. When using an external monitor with a laptop, the best results are achieved when the screens resolution is the same as that of the laptop’s screen. George reiterated the point that you will not have a 4K image on the large monitor, when the laptop outputs only 1920 x 1080.
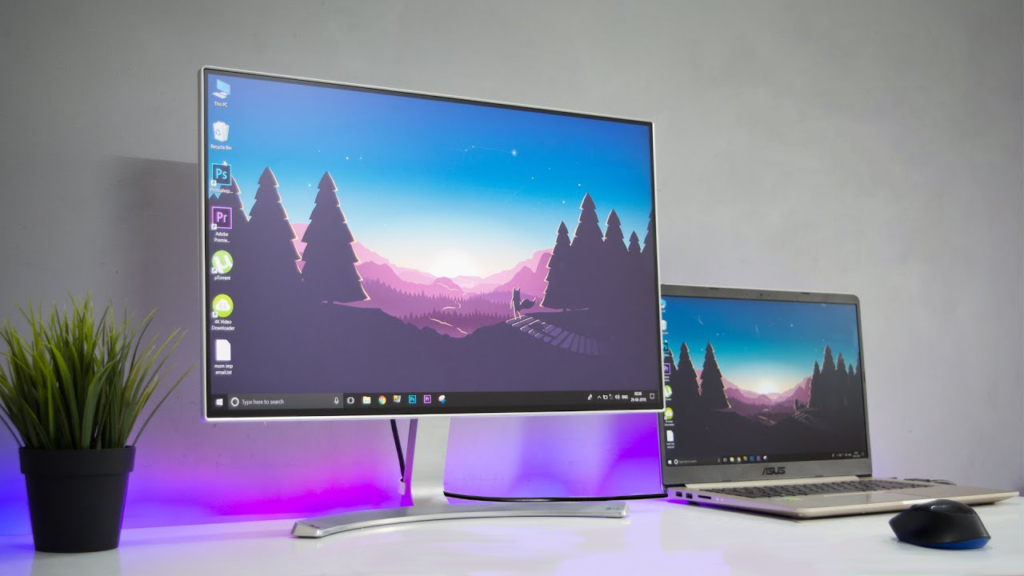
Figure2 – Laptop to Monitor connection
Another point to consider is the cable connectors needed to connect a laptop to a new monitor. If the laptop has only a VGA output, be aware that many new monitors do not support VGA. You may need to purchase an adapter or special cable for a new monitor with only HDMI ports. George warned that some monitors do not come with cables.
Once a new monitor is purchased, you’ll find the old monitor makes an excellent second screen. The connections from the computer’s graphics card or on-board graphics, to the monitor will limit the resolution. Even a monitor with only a low-resolution VGA output will still make a significant improvement to productivity as Mrs Skarbek will vouch. If using 2 monitors, you’ll find it almost impossible to have colours matching unless the monitors at are the same brand and model.
George’s presentation will be made available on the East SIG website for those wanting the full coverage of this topic.
In a second and shorter presentation George outlined his recent experience using a very cheap WiFi extender. George found the WiFi signal to a new installation of micro invertors to existing solar panels at his house were regularly dropping out. As the reconnection of the WiFi signal required a complicated and timely process, George investigated using a WiFi extender to solve the problem. A search of JB HiFi and Officeworks found WiFi extenders started in price from $80 up to $280 plus. A search from Amazon found a sub $15, 2.4 GHz WiFi extender that George felt was worth trying. It was ordered late one day and arrived the next.
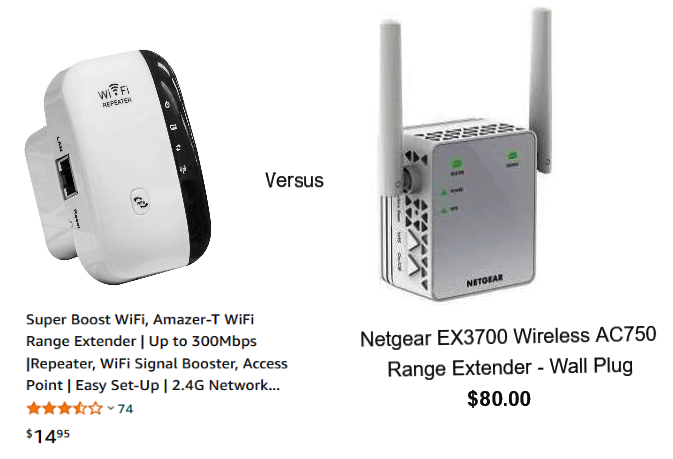
Figure 3 – Cheap WiFi versus Expensive WiFi extenders
The WiFi extender first needed to be set up to ensure it was amplifying the correct signal and not that of a neighbour. To do this George plugged the WiFi extender into an ethernet port. When it identified itself correctly, George then configured it to give it the same SSID, station identifier and password as his existing WiFi.
After minor installation problems requiring reading of the manual, the WiFi signal connected and gave a 42,000 times signal strength improvement over the original signal. In his presentation George displayed screen captures from WiFi Analyzer of before and after the install, along with other tabulations he used to verify the connection. As the original WiFi signal was so weak, final graphs presented showed there were still gaps in the received signal. However, these gaps did not affect the connection to the micro invertors. In conclusion, a super cheap device was all that was needed to solve George’s problem.
Dave Botherway followed with his ongoing series on “Making more use of Zoom”, this time using self-select breakout rooms. Breakout Sessions (where the host allocates rooms) have been around for a while, but recently a new feature has been added. It is now possible for attendees to select which room they wish to go to – based on a chosen topic.
From Zoom version 5.3 on:
- Attendees can select which room they wish to attend
- Topics are pre-defined, but can be added before a break out occurs.
- Attendees can see who is in various rooms and can move between rooms
- Each room needs a “leader” to control discussion
- The host can set time limits and reminders
- The host can broadcast messages to all rooms
Figure 4 below is taken from Dave’s presentation and shows the various screens users will see when using Zoom Breakout Rooms. The first graphic shows the new “Breakout Rooms” icon on the hosts toolbar. This icon is only displayed on the hosts toolbar if “Breakout Rooms” have been setup by the host to use in the session.
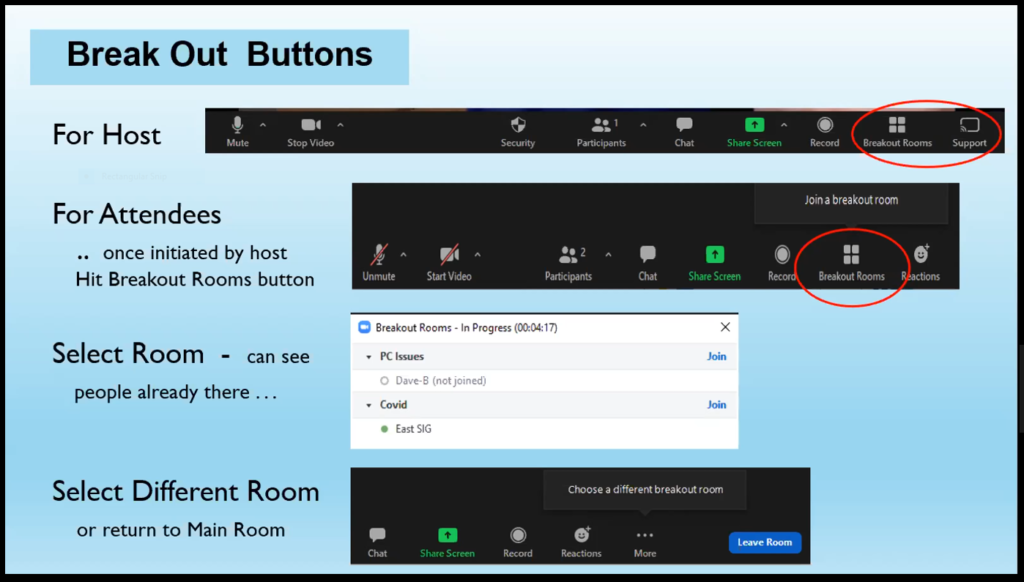
Figure 4 – Breakout Rooms Buttons
Only when the host initiates Breakout Rooms will the “Breakout Rooms” icon appear on the attendee’s toolbar. They will then be invited to “Join a breakout room” by clicking the “Breakout Rooms” icon. The second graphic shows the icon on the right side of the attendee’s toolbar.
After selecting to join a breakout room, attendees see the panel shown in the third graphic. Here they select “Join” opposite the room of their choice.
The fourth graphic displays a “Leave Room” icon on the attendee’s toolbar which appears after they’ve entered a breakout room. Here they have the option to “Choose a different breakout room” by selecting the “Leave Room” button. When leaving the room, attendees are returned to the screen shown in the third graphic.
To demonstrate breakout rooms, Dave played a short video to show breakout rooms in use, (https://www.youtube.com/watch?v=C5s9AN4nt6w) after which attendees had 10 minutes to try breakout rooms themselves. This proved very successful and is likely to be used at future meetings.
As a follow-on from last month’s presentation on “Simple Tab Groups” in Firefox, Tony Froster gave the next presentation on “Reorganization of the Favourites Bar to Folders” and “Using the Collections Tab in Microsoft Edge”.
Using Folders on the Favourites Bar in the Edge Browser.
The first topic of this presentation outlines Tony’s experience changing the Favourites Bar in Microsoft Edge from individual favourite icons, to folders containing multiple favourites. (The term favourites is used by Microsoft and is synonymous with the term bookmarks used in other browsers.)

Figure 5 – Folders shown on Tony’s Favourites Bar
Adding folders to the Favourites Bar has been around since the days of Microsoft Internet Explorer, but is a feature Tony has only been using for the last 12 months when his favourites became more difficult to find. Replacing individual bookmarks or favourites with folders is available in other Chromium browsers (Chrome, Opera etc.) and also in Firefox.
The default setting in Microsoft Edge is to have the Favourites Bar displayed. For installations where this isn’t the case, Tony showed how to make the Favourites Bar visible. This is done by clicking on the 3 dots at the top right corner of Edge and select “Settings”. When the settings page opens select “Appearance” and against “Show favourites Bar” select “Always”. The Favourites Bar will now be visible.
To add a folder to the Favourites bar, right click on the Favourites Bar and select “Add Folder” from the dialogue box that opens. Refer Figure 6. Next name the folder and click “Save”. A minor disadvantage using folders is the folder icon cannot be changed. Whereas favourite icons generally are unique and easily recognised, multiple folders all have the same icon. Tony finds using folders far outweighs this minor disadvantage as his favourites are now more organised and easier to access.
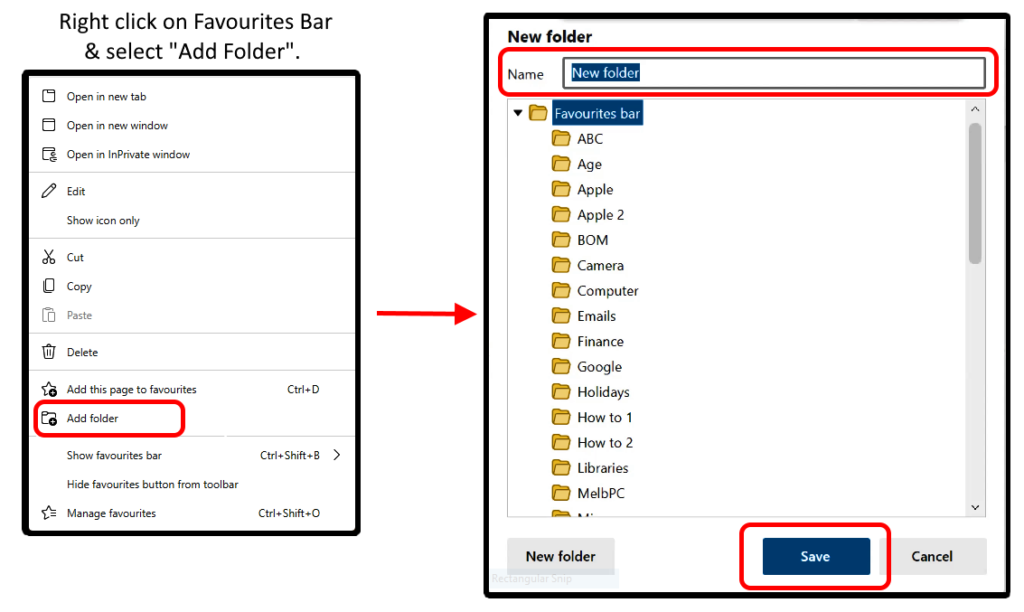
Figure 6 – “Add folder” to Favourites Bar Dialogue boxes
Favourites previously saved, either on the Favourites Bar or in the Favourites menu, can be dragged into the new folder you created on the Favourites Bar. The position of any favourites or folders on the Favourites Bar can also be dragged into your preferred position.
Adding a favourite to a folder on the Favourites Bar is the same process as saving an individual favourite. Open the website you want to add, click on the star at the right end of the URL bar and save to the required folder. Favourites within a folder can be rearranged by dragging or sorted alphabetically. Sub folders can also be created within folders on the Favourites Bar. Tony followed by demonstrating all the above actions.
Figure 7 below depicts how favourites are displayed and can be selected from Tony’s BOM folder on his Favourites Bar.
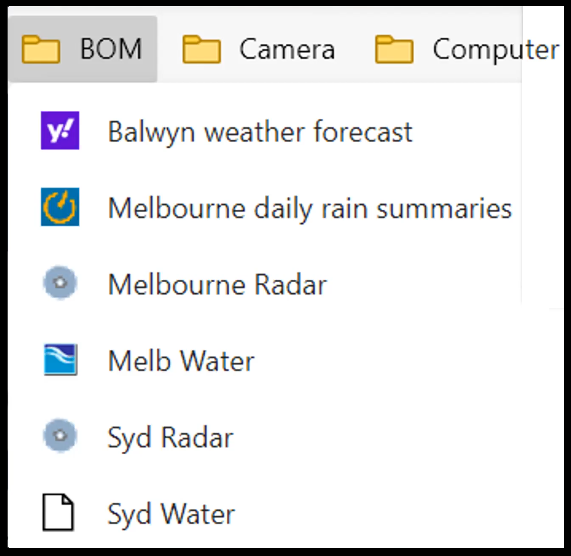
Figure 7 – BOM Folder Favourites
A tip that might be useful to others is the way Tony records the Zoom links to SIG meetings. Tony created a “MelbPC Zoom” folder on the Favourites Bar containing the favourites (Zoom links) to the various SIGs he attends via Zoom. Now there’s no more searching for the email with the meeting link.
According to Tony having folders on the Favourites Bar has “revolutionised” how he uses his browser and favourites. Where previously it was difficult to find favourites from long lists that stretched down multiple pages, now favourites are more organised and easier and quicker to access.
Using the Collections Tab in Microsoft Edge
The second topic in Tony’s presentation related to managing tabs in Microsoft Edge. The pre-Chromium version of Edge had a feature called “set aside”, where Tony was able to hide and later restore open tabs. He found this very useful in a similar way to hiding tabs in Firefox using Simple Tab Groups.
With the arrival of the new Chromium based version of Edge (now bundled with Windows 10), the ability to hide tabs was removed. To get back some of the lost productivity from the removal of this feature, Tony demonstrated two techniques he hoped would help. The first was to set Edge to “continue where you left off”. This helped by loading all the tabs you had open when Edge was last closed. This was not very successful in replacing the ability to hide tabs, but helped in a minor way. A second technique Tony adopted was to use the Task View Timeline in Windows 10. Task View enables you to scroll through a timeline of activities you performed over the last 30 days, including web pages viewed.
Setting Edge to open where you left off and using the Task View Timeline still did not replace the ability to hide tabs. When Microsoft introduced a new feature called “Collections”, that changed everything for Tony. “Collections” allows users to set aside multiple open tabs in the Chromium based Edge browser. These collections of tabs will not be lost if you close Edge or shut down the computer.
To start a new collection, left click the “Collections” icon located in top right-hand corner of the Edge browser window. Select “Start new collection” then select “Name new collection”. From here you can select “Add current page” or “Add all tabs to new collection”. When tabs are added to a new collection, they appear in a vertical panel on the right-hand side of the browser window, as seen in Figure 8. When wanting to open a single tab from a collection or a whole tab collection, this is performed again via the “Collections” icon. Click on the 3 dots and click “Open all”. This will open the collection in a new opening of Edge.
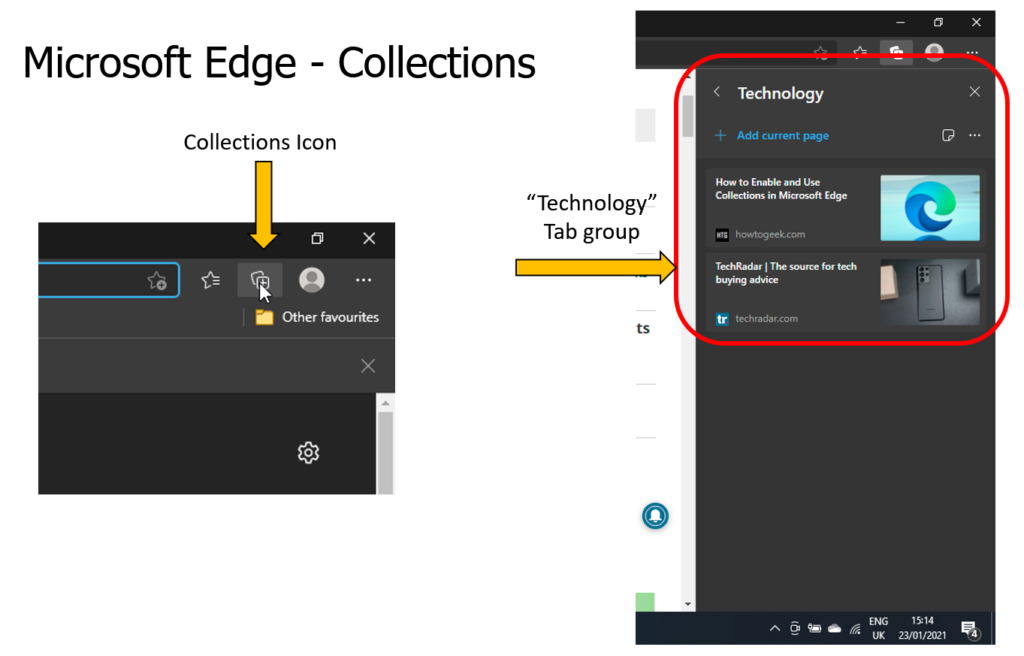
Figure 8 – Microsoft Edge, Collections
Vertical Tabs
Recently a new feature in Edge gives users the option to arrange tabs vertically on the left side of the browser window, instead of along the top of the screen. This feature is activated from an icon on the top left corner shown in Figure 9 and is located where the “set aside” icon was in the pre-Chromium-based version of Edge.
![]()
Figure 9 – “Turn on vertical tabs” icons Figure 10 – Pin tabs vertically
When selecting vertical tabs, the panel that opens is shown in Figure 10. This panel displays vertical icons for each webpage, along with a brief description of the webpage. The panel can be pinned permanently or collapsed as required. As this is a very recent Edge feature, Tony went on to show how Edge can be updated to the latest version. To conclude, Tony gave a live presentation showing both how to set up a new collection and to display vertical tabs.
At last month’s Zoom meeting Dave Botherway discussed the future format of East SIG Meetings for the current year. A poll was taken at that meeting, with around two-thirds preferring Zoom meetings over COVID-19 restricted face to face meetings. The situation has changed somewhat with the likelihood of Whitehorse Council easing their COVID-19 requirements for meetings, a successful test of Breakout Rooms and current testing of hybrid meetings. To gauge the feeling of members, the committee felt it needed to run an updated poll. A Zoom poll titled “What is your preferred meeting format and why?” was run by Dave, with Zoom again being the preferred option.
The meeting concluded with informal discussions between audience members. Items from the meeting and audio quality issues were the major topics discussed.