Neil Muller
Host Paul Woolard opened the August meeting, again with all members back at home joining the meeting via Zoom. The first presentation of the night was George Skarbek presenting his normal Q&A segment.
Q. On John Hall’s recommendation, I bought a Synology NAS box (Network Attached Storage) and I want to back it up to Acronis. I have 3 computers and I can enter the network credentials into 2 of them and everything works well. However, on my main computer its doesn’t connect to the NAS box. I’ve been into credential manager, ethernet adapter, checked for the client in Windows but nothing seems to work. The NAS box tells me it’s the wrong password and credentials, but these are the same that work on the other 2 computers.
-
[John Hall] One problem you can have with certain computers is an add-on called Samba or abbreviated to SMB. Some computers will not connect with SMB and there is a trick you have to use on certain Windows computers.
[George] John is on the right track. There are several versions of the SMB file. In Windows you will need to check what version of SMB you have. You may have the latest SMB3, but its SMB2 or 2.1 you need. As its your main computer you may have the latest version of SMB installed. On some computers the latest version however doesn’t work, so you have to go back to an older version for some NAS boxes.
Figure 1 – Synology NAS Boxes
Q. Two days ago, Google Chrome updated to the latest version and deleted all the bookmarks on my favourite bar. I had to copy then all over from Firefox. I found Chrome no longer had an option to download favourites from Firefox. The screen also changed from the one I normally use. Has anyone else experienced these problems?
A. [Neil Muller] I recently installed Chrome’s experimental feature called Tab Groups Collapse. A few days ago, I found all the tab groupings had disappeared. This may be related to the problem you encountered.
[George] I use Chrome as my main browser on 2 of my computers and they’ve upgraded several times recently and I’ve lost nothing. Sorry I can’t help.
Your experience shows why it’s worth having more than one browser you can use. This is especially true if your browser is disabled from some nasty malware you may have downloaded. That would stop you downloading a fix such as Malwarebytes. I suggest you have 2 or preferably 3 browsers on your computer that you can use.
Q. I have a problem sending one of my computers, a Ryzen 7000 to sleep. Sometimes it works and sometimes it doesn’t. I’m thinking Team viewer or maybe Outlook with its periodic checking for mail may be keeping it awake. Has anyone got any ideas?
A. You’re on the right track, its Wake-on-LAN. If you don’t need it, you can switch it off. If “Wake-on-LAN” is on, as soon as there’s any networking it will wake the computer up. Whereas if you turn it off, if it wants to get something it won’t wake the computer up.
You’ll find Wake-on-LAN in Windows Setting.
Open Settings Click on Network & Internet Click on Status Under the “Advanced network settings” section, click the Change adapter options button Right-click the active network adapter select the Properties option Click the Networking tab Click the Configure button and scroll down to “shut down Wake-on-LAN”.
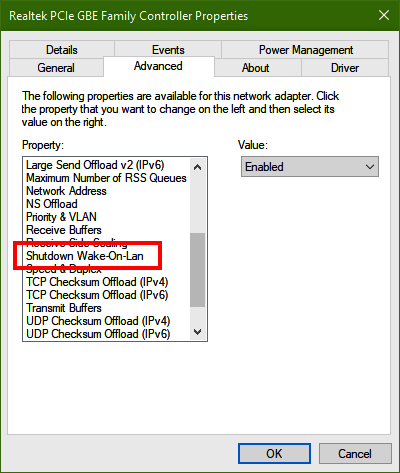
Figure 2 – Wake-on-LAN
Q. I’m considering loading Microsoft Office 2019. I’ve read that some say you should remove earlier versions of Office first, while other posts don’t mention it at all. I’m concerned if you remove the earlier version, that I may lose all my emails out of Outlook and all my documents? I imagine that’s not the case, but thought I needed to check first.
A. You don’t lose your data, your emails or settings by upgrading to Office 2019. Unless you have a very old version of Office 2003 or earlier, there shouldn’t be any problems. That’s because Office 2007 was a complete rewrite of the Office kernel. If you’re still concerned, do a full image backup then uninstall the old version of Office before installing Office 2019, then you shouldn’t have any problems.
[David King] I think I’d make a straight copy of all the Outlook files and put then somewhere first. Then you’ve got all your emails and contacts if you need them. Search for the .pst or .ost file.
Q. One of my Windows machines with a UEFI Bios comes up with the incorrect time, which can be out by several hours. I have to then manually correct the time. However, if I boot the same computer up with my Nomad UNIX stick, the time comes up correctly. What is the association of the time on the machine and Windows?
A. Unless its changed in one of the recent Windows 10 upgrades, Windows synchronises your computer with an atomic clock, either once or twice a week. But if your battery in the computer is almost dead, you could lose an hour a day. You may have to go a few days before Windows synchronises again. That is most likely the cause of the time error. You could go to “Task Scheduler” in Windows and set a task to check the clock at say a set time every day. I suspect that the reason your UNIX disk has the correct time is that it synchronises the time on bootup.
Following Q&A, Trevor Hudson played a video he’d prepared showing how to “Reduce background noise using Audacity”, a free and powerful audio editing program.
In a test audio file, Trevor showed how 30 decibels (db) of background noise was reduced in stages to 0db. The technique used was to select a portion of audio that only contained the background noise. This section of the audio file is then used to create a noise profile, which is later used to subtract the background noise from the original audio. This is done from Audacity’s main menu by selecting “Filter”, then “Noise reduction” from the drop-down menu.
Using the selected noise profile created, Trevor showed how background noise was reduced or removed completely by entering various db levels in the “Noise Reduction” window. Trevor has updated the video he showed at the meeting. The updated video can be found on YouTube by searching “Reduce Background Noise Using Audacity” or use the following link https://www.youtube.com/watch?v=Y6C_BAyheas
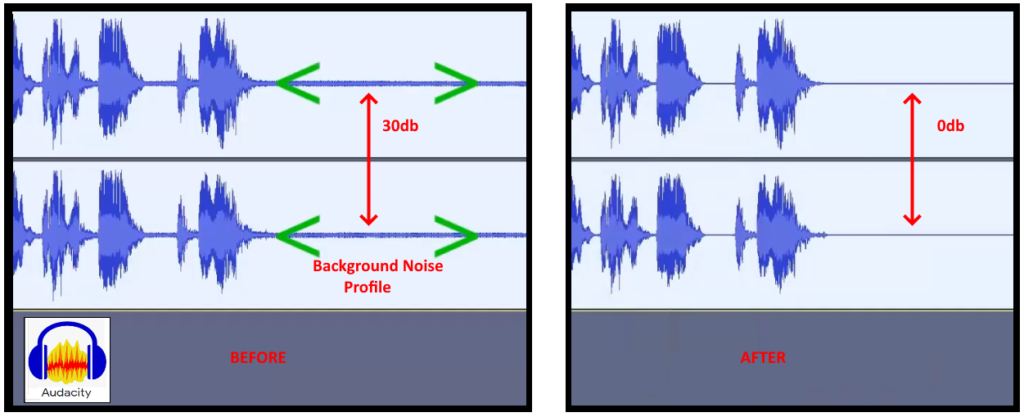
Figure 3 – Audacity Background Noise Removal
Trevor would like to advise members of the following: “Trevor’s proper HX7V channel still isn’t active because he breached YouTube copyright. He’s now uploaded the updated video to another YouTube Channel called Trevor Hudson. Therefore, members are advised to ignore the mention of links to other sound videos or to subscribe to his old channel.”
The nights next presentation was by Dave Botherway on “Back-up Software, Macrium Reflect and EaseUS-ToDo”. Macrium Reflect and EaseUS-ToDo are both backup programs that have both free and paid for versions. When the free versions of both are used together, they complement one another by providing all the tools needed for backing up a PC, as Dave demonstrated. Macrium Reflect provides a full image backup, while EaseUS-ToDo will backup files and folders, something that the free version of Macrium Reflect won’t do.
Before looking at the 2 software programs for backing up a PC, Dave commenced by explaining the terminology used and how they differ. This is important as these are the terms you’ll come across when using both Macrium Reflect and EaseUS-ToDo.
There are two backup styles:
-
Clone Backup – Used when copying the whole disk to a second device. This could be when a hard drive is failing and needs to be replaced or when moving from a mechanical HDD to a SSD.
-
Image Backup – Creates a copy of a partition or partitions, to either a separate partition or external drive.
There are 3 type of Image backups:-
Full backup – copies everything
-
Differential backup – copies the change since the last full backup. Here you need a Full backup plus the last differential backup to restore your PC.
If you have multiple differential files, you can restore a PC to the date of the differential backup file in a similar way as you would use Windows “System Restore”. -
Incremental backup – copies the change since the last incremental backup. Here you need a Full backup plus all incremental backups to restore your PC. The free version of Macrium Reflect doesn’t allow Incremental backups.
-
Figure 4 below from Dave’s presentation, graphically represents the differences between Differential and Incremental backups. To restore a PC in Figure 4 using a Differential backup, you need only the week 1 (full Backup) & the week 4 backup file, while using Incremental backups, you need all of the weeks 1 to 4 backup files.

Figure 4 – Differential versus Incremental Backup
When downloading Macrium Reflect and EaseUS-ToDo Dave recommends using the owner’s website. For Macrium Reflect download from http://www.macrium.com/Reflectfree
When creating a backup plan the following process is followed. After completing each step, a new window opens for entering selections for the next step:
-
Select the style of backup (Clone or Image)
-
Select whether the backup is the whole disk or one or more partitions
-
Select the destination of the backup files
-
Select the type of backup (Full, Differential or Incremental)
-
Select a backup schedule (Monthly, weekly, daily etc.)
When opening Macrium Reflect, the window shown in Figure 5 is where the first selections are made. Area 1 from Dave’s screen capture shows the partitions on the PC’s hard drive that can be backed up. Here you can select whether to backup the whole drive or selected partitions. This is done by ticking the appropriate boxes as shown. In Figure 5 only the partition for the C Drive is selected to be backed up.
The “Actions” panel (labelled area 2) is where the selection is made to either “Clone this disk”, or “Image this disk”. In this example, when selecting “Image this disk” a window opens where you enter the destination to store the backup file. Once making that selection, a new window opens asking for the type of backup, either Full or Differential. Finally, a Windows summarising options nominated is displayed, which if correct, you confirm by selecting “Finish”. You then have the option to run the backup or store the settings to run at a later time.
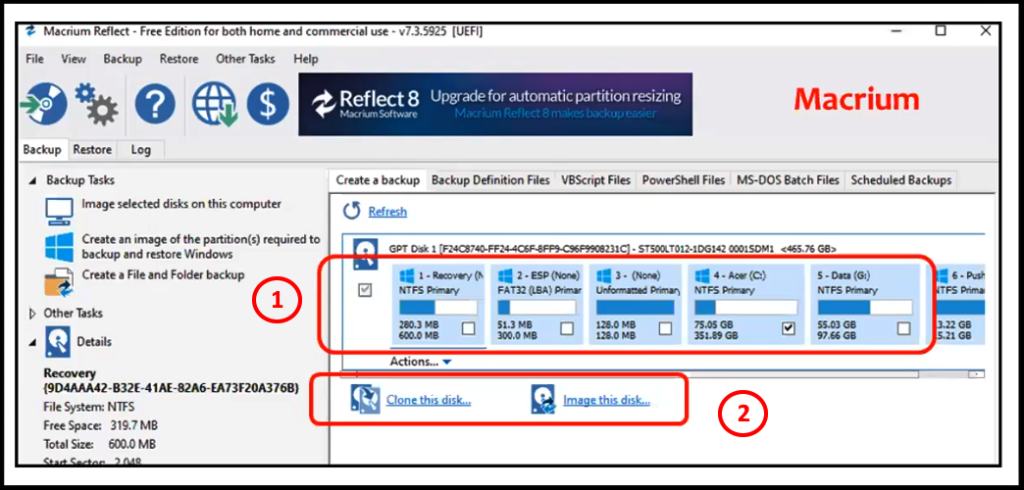
Figure 5 – Macrium Reflect home screen
After an image has been created, it is a good safety measure to verify that the backup has been successful. This is done by mounting the image, a process where Windows chooses another drive letter to display an exact copy of the back-up file. When double clicking on the Macrium Reflect image file (a file with a .mrimg file extension), Windows recognises the file as a Macrium Reflect file. Macrium Reflect opens then mounts the image file so that all the files and folders in it can be viewed in Windows File Explorer. Here you can restore individual files or folders and copy them back to your PC. This is a good method to prove the validity of the backup. In Dave’s presentation he showed the various windows for mounting a drive and then how the drive is displayed in File Explorer.
Both Macrium Reflect and EaseUS-ToDo both offer an option to create a rescue disk. This is an important option to have if Windows won’t boot. To create a rescue disk in Macrium Reflect, select the “Other Tasks” option shown in Figure 5, then select “Create Rescue Media”. Dave showed screen captures of the process of creating a rescue file. Then how the rescue file can then be burnt to a CD/DVD, or as an ISO file, which can then be written to a USB stick. The rescue media then allows you to boot back into Macrium Reflect to restore the C drive, should Windows not boot.
To conclude, Dave highlighted the difference between the free and paid Pro versions of Macrium Reflect. The main difference being the Pro version allows incremental backups, can backup individual folders or files, can redeploy a backup to different hardware, but costs around US$70.
The second backup program Dave presented was “EaseUS-ToDo“ free version. To overcome the deficiencies of the free version of Macrium Reflect, “EaseUS-ToDo“ free will do scheduled incremental back-ups of individual files and folders. Dave then demonstrated how to backup files and folders, by again using screen captures of the processes involved. Next Dave highlighted the other options available in “EaseUS-ToDo“ free and the differences between the free and paid for versions. The paid for version includes options to backup emails and clone a disk.
An alternate to backing up files and folders with “EaseUS-ToDo “, is a program Dave demonstrated at East in 2016 called “FreeFileSync”. This program allows 2-way syncing and mirroring of files and folders and can do incremental back-ups. Dave indicated he still uses FreeFileSync due to its ease of use to sync his Eudora email files on his Laptop from his main PC.
Following his PowerPoint presentation, Dave gave an excellent live demonstration of both Macrium Reflect and EaseUS-ToDo’s free versions.
The final presentation of the night was titled “What’s Involved in Flying a Drone” by George Skarbek. George’s presentation commenced with the legal requirement involved in flying a drone, followed by the hardware and techniques involved in flying a DJI Spark drone.
Legal requirements
For drones under 2 kg, a licence is not required, but the drone’s user needs to be registered with CASA (Civil Aviation Safety Authority). Registration is no simple matter, requiring your name, Passport or Birth Certificate number, Medicare number, address and phone number, all to confirm your identity. Registration is free if the drone is under 2 kg and is used for private use. There are restrictions that must be adhered to. You can’t fly within 5km of an airport (with fines up to $11k if you do), you can’t fly at night, in National Parks, near a goal, over people, above 120 metres above ground level and the drone needs to be kept in visual sight at all times. A commercial licence is required to fly above 120 metres and is expensive.
Features of the DJI Spark
The Video production SIG has recently acquired a DJI Spark drone and this is the drone referred to in George’s presentation. The DJI Spark (https://www.dji.com/au/spark/info) is now a discontinued model but is still an excellent drone as George demonstrated. A feature missing that some newer drones have is a “follow me” option, where the drone will follow the controller.
The Spark is small in size and weight, with dimensions of 143×143×55 mm (excluding the propellers) and weight of only 300g. It has a 1480 mAh rechargeable battery, can fly for a maximum of 15 minutes and connects to both GPS & Glonass (Russian) satellites for position.
The Spark uses a smart phones screen to display the view from its camera. The camera shoots video in high definition 1920×1080 30p and images at 3968×2976 pixels. The drone’s camera has a pitch of 0 o to -85o, so is able to shoot at near vertical photos or videos. Images George displayed of his house taken at 120 metres were so sharp that individual tiles on houses and powerlines were clearly visible. Photos and videos can be taken from buttons on the phones screen.
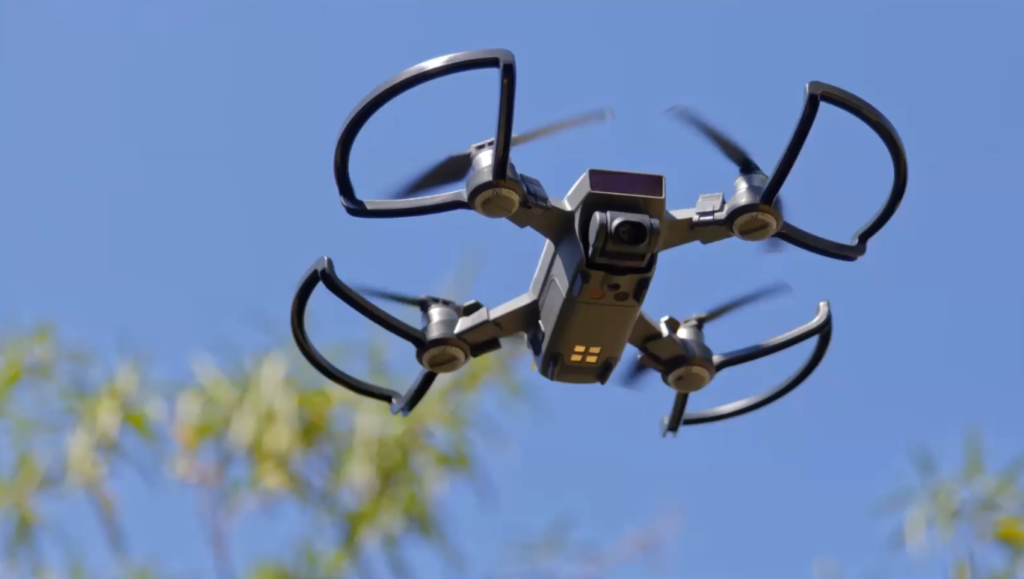
Figure 6 – DJI Spark drone
A smart phone is clamped to the bottom of the Spark’s controller and is connected to the phone with a cable. There are 2 rotatable antennas on the top of the controller unit, as visible in Figure 7. The phones screen is used to display the view from the drone’s camera. Other relevant data displayed on screen includes a map of the area below the drone (derived from its position data), whether the drone is locked onto GPS & Glonass (Russian) satellites, battery level, height plus other flight data.
The drone has horizontal sensors so it won’t fly into anything solid and a sensor below used when descending so it lands very softly. When in flight, a warning appears when the maximum height set is reached and an oral warning when the battery has reached 30% charge remaining.
If the Spark is kept in sight of the controller, the drone will automatically return to home when that option is selected. When pressing home, the drone flies to its maximum height, to avoid obstacles such as trees and powerlines, then turns around to land where you took off from.
Controlling the DJI Spark
Before using the DJI Spark, you will need to download the DJI Spark app to your smart phone and user manual. George found the Spark easy to fly and very stable, except in strong winds. It flies horizontally and is controlled by 2 joysticks on a hand-held controller.
The Spark has 3 flight modes, Beginners (which must have a GPS signal), Advanced (that doesn’t need GPS, but the controls are more sensitive) and Sports. When learning to use the drone, George recommends using Beginner’s mode in an open area where a GPS signal is available
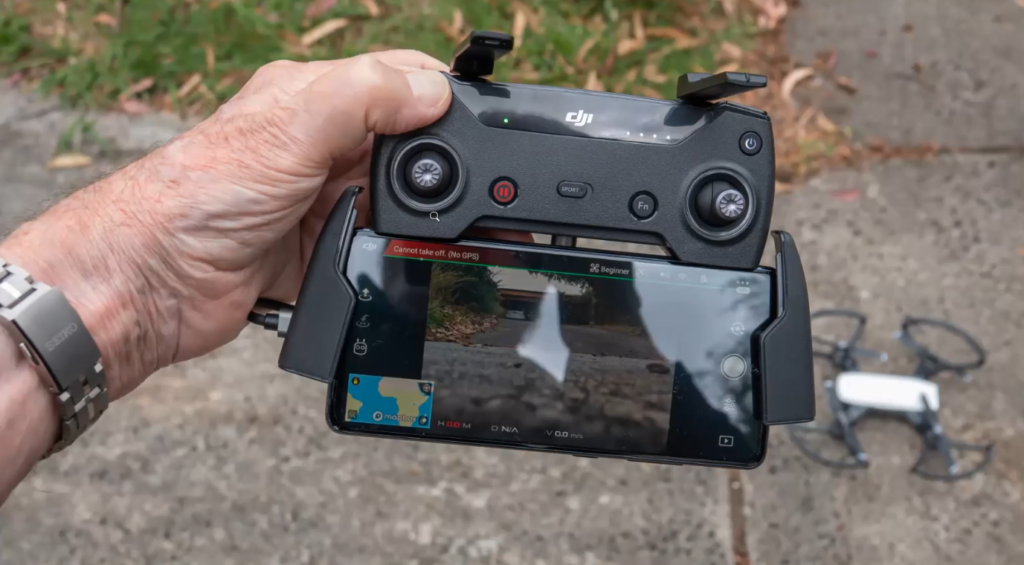
Figure 7 – The DJI Spark’s Controller
The controller has 2 joy sticks and attaches to a smart phone which displays the view from the drone’s camera. The left joy stick controls the drone’s height up and down. When the joystick is moved sideways, the drone yaws or rotates on its axis, to the left or right depending on the direction the joystick is moved. The drone remains horizontal at all times. When moving the joystick at 45o, the drone moves up and to the right. When moving the joystick up or down, the drone can go up or down vertically up to 3 m/sec.
If the right joystick is moved forwards the drone will go straight ahead. If the joystick is moved backwards (i.e. toward you when holding the controller in front of you) causes the drone to fly backwards. When moving the joystick sidesway, the drone rolls (in an aviation sense) to the left or right according to the joystick movement. Moving the joystick at 45o the drone flies forwards and at 45o as it flies, but the drone does not turn on its axis.
George commented that the fact that he has a pilot’s licence hasn’t helped him one bit in mastering the controls. In fact, it’s almost the opposite as you don’t have any preconceived ideas as what pitch will do.
After this introduction to the DJI Spark’s features and controls, George played a short video he took of a drone flight around a mural on a cylindrical concrete water tower in central NSW. Following the video, George took a number of questions before wrapping up the meeting for the evening.