East SIG Report September 2020
9th October 2020
Neil Muller
East SIG convener Paul Woolard opened the September meeting for the second time via the internet conferencing software Zoom along with Frank Maher the Zoom host. Another large audience attended, with members as far away as Echuca and Queensland joining the meeting.
The night’s first presentation was by Dave Botherway expanding on his talk from last month on Zoom, titled “Making more use of Zoom”. Before beginning the presentation Dave noted that depending on a user’s device, be it a Windows computer, an Android or iPad tablet, or a smartphone, the Zoom screen may have a different appearance from the graphics he will be showing. The PC’s capacity, the internet connection, or attending as a host or guest can all result in the Zoom screen having a slightly different appearance. The graphics following have all been taken from a Windows desktop computer.
There are 2 types of Zoom users. The first is the host & co-host. The host sets up the session and invites attendees. They control the session and can pass the role to another person if required. The second type of user are those invited to attend the meeting and are called Guests. Guests can act as permitted by the host. You can refer to the August meeting report for greater details on these roles.
The Zoom window comprises 3 sections. The main user toolbar is at the bottom of the screen, a panel at the top of the screen, and the participants’ view in the middle. Participants can appear in Grid View or Speaker View. Dave gives more details on this section later in his presentation. In Figure 1 meeting participants appear in Grid View. The names of each participant are usually shown below and to the right of their video display, however, I’ve removed the names for privacy reasons.
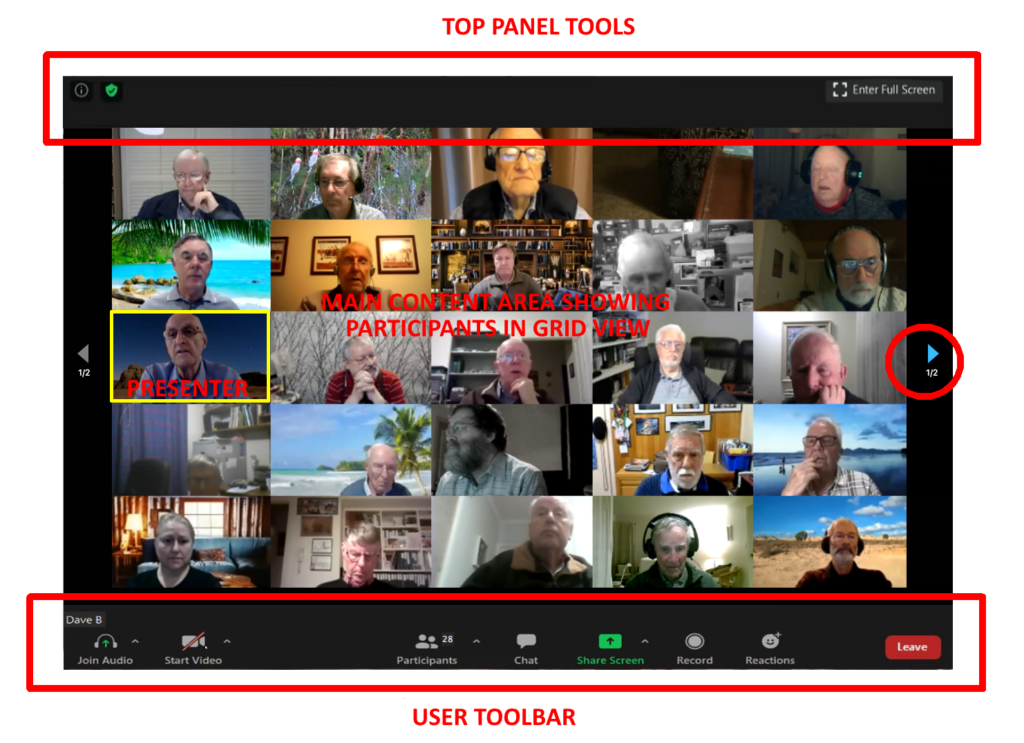
Figure 1 – The Zoom Window

Figure 2 – The Hosts User Toolbar
The User Toolbar at the bottom of the Zoom window is the location of the controls you’ll use first. (Note that the host’s User Toolbar above is slightly different from that of Guests toolbar. Those differences will be noted as they are encountered later in the presentation.)
Toolbar icons from left to right are:
- Join Audio – Click this icon to Start or Mute Audio. Select the up arrow icon to the right of the icon to change audio settings. It is recommended that audio is left muted unless talking as this will minimize background noise that everyone else will hear. The host is able to mute everybody if needed, but can’t unmute them. As an alternative to clicking the Unmute Audio icon to speak, the space bar can be held down while talking and then release when finished. This did not always work when tested later.
- Start Video – Clicking this icon will Start Video & Stop Video. The red diagonal line through the icon in Figure 3 indicated the video is stopped. By selecting the up arrow to the right of the icon offers further options to Select a Camera, Choose a Virtual Background, and adjust Video Setting. When selecting a virtual background a window opens where you choose from a selection of backgrounds. Alternatively, you can upload your own background.
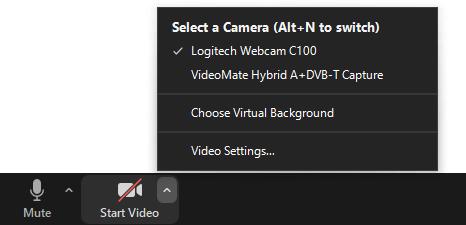
Figure 3 –Zooms User Toolbar (Guest) – Start Video
- Security – This option is only shown on the host’s or co-host’s screen. If you are hosting a meeting, selecting Enable Waiting Room allows the host to control who is allowed entry to the meeting. Other understandable options are shown in Figure 4 below.
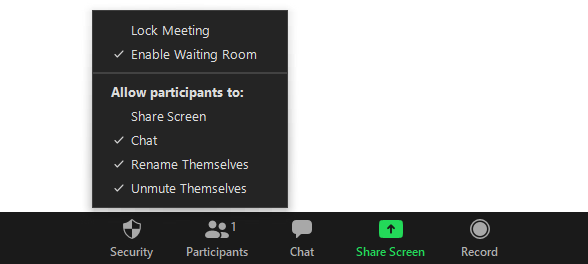
Figure 4 – Zoom User Toolbar – Security (Host only)
- Participants – The number attending the meeting is shown beside the Participants When you click on the Participants icon, a panel showing participant names (Figure 5) opens on the left side of the Zoom window. To the left of the participant’s names are icons that show whether participants have their audio and video turned on or off. The host can mute all microphones if extraneous noise is heard during a presentation. The series of icons at the bottom of the Participants panel (Figure 5) are used by participants to signal the host or co-host. The Raise Hand icon should be used when asking questions. When participants fill more than a single Zoom window as in Figure 1, using the Raise Hand makes it easier for the host or co-host to tell when someone wishes to ask a question. The Yes & No icons are for taking polls and the go slower and go faster are used to assist the presenter.

Figure 5 – Participants panel
- Chat – Audience members can chat by text to everyone or to just one person attending the meeting. When sending messages, the text will appear above the Chat icon on the Toolbar. The message will remain for a short time and then disappears from view. Figure 6 below shows how both messages to everyone and private messages are displayed. At the bottom of the chat window is where you type your message. Those using iPads will find the Chat function is triggered by press the 3 dots at the top right-hand corner of the screen.
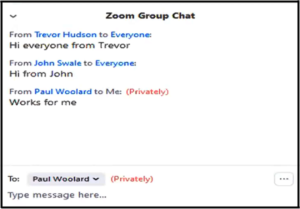
Figure 6 – Zoom User Toolbar – Chat function
- Share screen – This feature is activated by selecting the green Share Screen icon on the toolbar. Refer to Figures 4 and 8. Sharing your screen with others at a meeting is controlled by the host and allows the sharing of content from a guest’s screen to everyone. When a guest selects Share Screen the Window shown in Figure 7 opens. Options available in Figure 7 are to share your computers Screen, share a PowerPoint presentation, share a Whiteboard or share other programs and devices you may have open.
When sharing a video or PowerPoint with audio, you must tick the Share computer sound tick box on the bottom left of the Window. This ensures that audio comes directly from the video or PowerPoint. A second tick box to the right Optimize Screen Sharing for Video Clip should also be ticked. This allows Zoom to change the resolution of the video to suit the speed of the PC and the internet bandwidth available. The presenter will also need to hide the presenter bar at the top of his screen otherwise it may cover a portion of the screen being viewed by others. The final step is to click on the Share button.
When playing a YouTube video Dave has found it easier to download the video to your PC and play it from there. Dave uses a browser add-on called Download Helper for this.
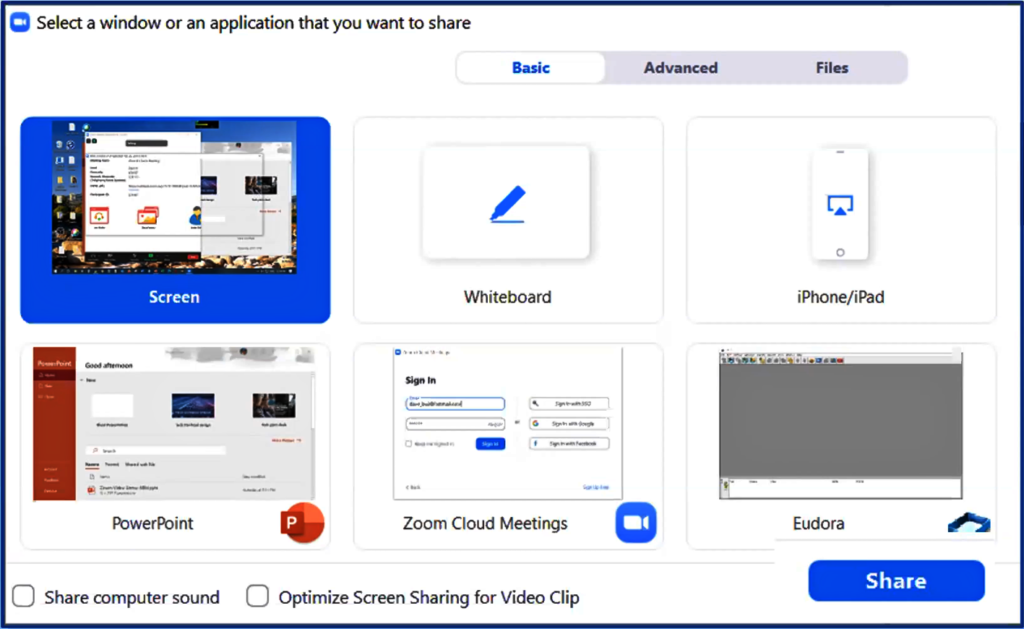
Figure 7 – Share Screen window
- Record – The host or co-host controls whether the meeting can be recorded. When the meeting is being recorded, a red dot is displayed at the top left of the Zoom screen. The recording can be stored in the cloud or on the hosts or co-hosts PC.
- Reactions – When selecting the Reactions icon 2 emoji’s pop up. Clicking either the clapping hand or thumbs up icon displays that reaction on screen. The emoji selected appears briefly on the top left of the guest’s screen image to give feedback to the presenter. IPad users will need to press the 3 dots at the top right-hand corner of its screen to display their emoji’s.
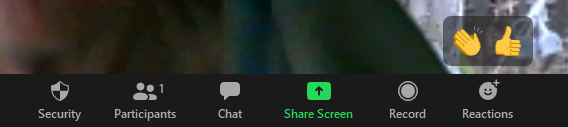
Figure 8 – Zoom User Toolbar – Reactions Icon
- Leave / End – This icon varies depending on whether you are the host or a guest. The End icon (Figure 2) is displayed on a host’s PC and allows the host to end the meeting. The Leave icon shown in Figures 1 and 5 appears on a guest’s PC and is selected when leaving the meeting.
The toolbar can be hidden from view if it obstructs part of a presentation by pressing the ALT key. Pressing the ALT key again will return the toolbar to view.
The second area of the Zoom screen you’re likely to use is the Top Panel. This panel has icons both on the top left and top right of the Zoom window as can be seen in Figure 9 below.

Figure 9 –Zoom Top Panel
The far right icon (a circle with i within) displays meeting information such as the session number. To its right, a green shield displays other settings. These 2 icons appear when hosting a meeting.
On the far right side of the Top Panel is the Enter Full-Screen icon. Selecting this icon will cause the Zoom window to completely fill the computer screen. Pressing ESC on the keyboard will Exit Full Screen.
In the centre of the Zoom Window is the participants area where videos from all those joining the meeting appear. Participants can change their display settings (if allowed by the host) by right-clicking on their video feed. A window appears giving options to Mute My Audio, Stop Video, Rename (this option allows a guest to change the name displayed below their video), and Edit Profile Picture (the image displayed when the video feed is stopped). The panel showing these options is shown in Figure 10.
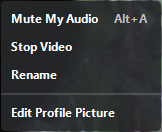
Figure 10 – Video and Display options
On the top right of the Zoom window are 2 icons, Speaker View / Gallery View & Maximise. These are shown in figure 11 below.
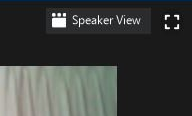
Figure 11 – Speaker view & Maximise icons
The Speaker View icon toggles between Speaker View and Gallery View when selected.
When Speaker View is selected the person speaking will appear in a larger video window than audience members. The size of the window they appear in will depend on the number of participants at the meeting. In large meetings, Speaker View will reduce the number of participants displayed on a single screen but will make it easier to see who is speaking.
Gallery View displays a small image of all participants in a grid pattern. (Refer to Figure 1) The grid expands and contracts as participants join and leave the meeting. When someone is speaking, the frame around their grid image is highlighted. Even with the frame highlighted it can be difficult to determine who is speaking in a large grid. The number of participants that can be shown in the grid pattern is dependent on the resolution of the screen display and the internet bandwidth available. On my HD monitor, the grid was 5 x 5 whereas on my Lenovo tablet it’s 2 x 2.
When a PowerPoint or YouTube video is being presented, Gallery View or Presenter View disappears and is replaced by a smaller overlay window showing participants. This smaller window may still obstruct the presentation but can be dragged out of the way or reduced in size. At the top of the window are 4 icons that adjust its size. When one of these icons is selected the view of participants can be reduced from a small grid down to a single bar. The view selected is denoted by the blue bar as seen in Figure 12 where only the speaker’s name is displayed. The fifth icon located at the top right displays the speaker on top of his presentation.
Figure 12 – Speaker view icon
At this stage of the presentation, Dave gave members the opportunity to investigate the various features mentioned in his talk. This opportunity was well-received by all those present.
Following Dave’s presentation, George Skarbek commenced his usual Q&A segment.
Q: I can no longer use the PrtScr (Print Screen) or Alt + PrtScr keys on my keyboard and believe some unknown program I may have loaded has hijacked the PrtScr function. I’ve previously used these keys to copy to a graphic program such as Irfanview or used it as a shortcut for Faststone Capture. My question is how can I get my PrtScr key back? I should add that I haven’t tried a different keyboard yet to determine if that might be the problem.
A: I haven’t come across that but will look into it. Alternatively, you can use the keyboard shortcut WinKey + Shift + S to cut out a portion of the screen. The clipped portion is saved to the clipboard, which you can then paste into a graphic program.
[Kelvin Cording] Have a look at keyboard mapping in Google and you’ll find a lot of information on mapping keys to particular functions.
Q: I’ve just bought a new 4K monitor which was advertised as operating at 60 Hertz. When I connect it up I’m only getting 30 Hertz. I think it’s a HDMI 1.4 problem. I’m using the cable that came with the monitor as the instructions with it were very specific about using the included cable. I’ve googled this and it appears HDMI 2 is what I should be using. How do I get around this problem? Does the connection from the computer have to be 1.4 or does the cable have to be 1.4Hz?
A: I would speak to the manufacturer first. HDMI 1.4 has a pretty substantial bandwidth so should cope with that very easily, but it would appear you need HDMI 2. If your computer doesn’t have the bandwidth to put out HDMI 2 you’re in trouble. Are you sure that the drivers on your computer are putting out HDMI 2.0? Run some diagnostic by pressing WinKey + R and key in dxdiag.exe and that will bring up information about your screen and video card and may give you a clue. (Tech Ed: HDMI 1.4 doesn’t have enough bandwidth to support 4K at 60Hz. Purchase a new video card.)
Q: Recently I received a number of emails supposedly from “Cortana at Microsoft” giving a summary of what I’ve been doing in the last few weeks. This email included snippets of my outgoing emails. Does that mean Microsoft is monitoring my email accounts?
A: That’s an interesting and worrying question. I don’t know whether Microsoft is or someone else is involved.
[Frank Maher] I received a similar email which I quickly deleted. I believe it came from using Yammer.
[George] I’d download the free version of Malwarebytes and run that. The free version is as good as the paid version for what you would need. Malwarebytes can check for items that don’t have a virus signature like hidden snippets from Cortana.
[Trevor Hudson] After the last Windows 10 update, Cortana displayed something that was only recorded in the calendar on my phone. I found where you unsubscribe and I did that. (Tech Ed: According to Microsoft, “the Briefing email helps you stay in control of your calendar and to help you better prepare for the day ahead”. More information can be found at https://docs.microsoft.com/en-us/Briefing/be-overview. MelbPC’s email service is based on Microsoft’s business email platform and the briefing email is probably not useful for personal users. You can unsubscribe by clicking on the Unsubscribe link at the bottom of the emails.)
After a short break Trevor Hudson showed a video he’d prepared on “How to overcome geo-blocking”. Geo-blocking is used to stop users from watching their TV subscription services such as Netflix or Stan on an internet-connected device, when they are out of the country. Trevor showed the steps needed to overcome geo-blocking starting with how to determine your IP address and finding and using a VPN (Virtual Private Network). The aim is to make the subscription service think that your device is still in Australia when you are out of the country. You do this by selecting Australia for your VPN service. Although the better quality VPNs require payment, Trevor named a number of free VPNs in his presentation. These free VPNs were add-ons to the popular Firefox and Opera browsers. For more details on unlocking geo-blocking, Trevor’s video can be viewed on YouTube by searching the title of this presentation.
George Skarbek followed with “Hints, Tips, Suggestions and a bit of What’s New”. Last month George briefly touched on Windows PowerToys and the overlay app. Microsoft purchased Windows PowerToys in 2018 (Tech Ed: No, Microsoft made Windows PowerToys open source in 2018) and it can be downloaded at https://github.com/microsoft/PowerToys.
With PowerToys installed, if you hold down the Windows key for a short time the overlay shown in Figure 13 appears.
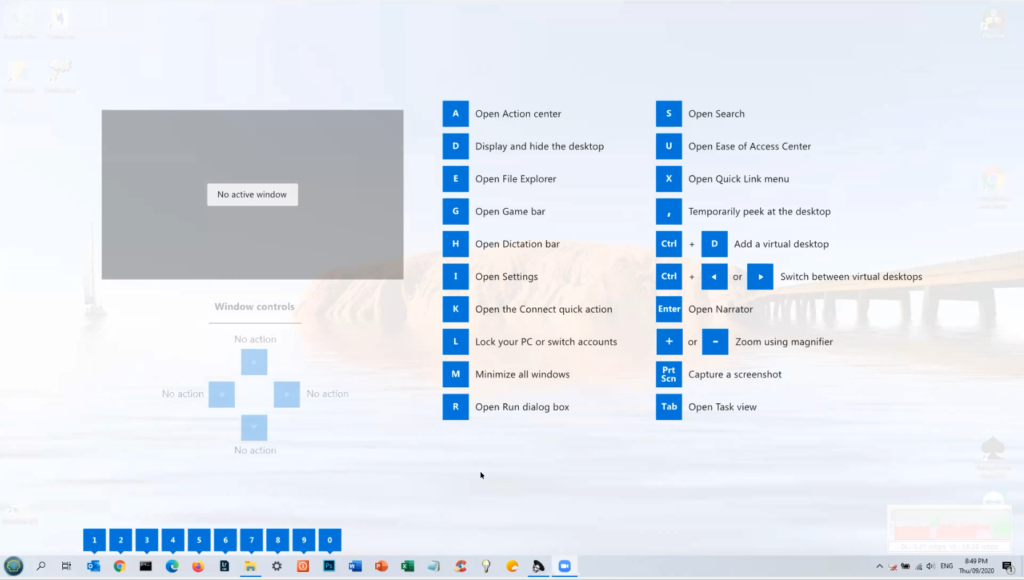
Figure 13 – PowerToys overlay
The purpose of the overlay is to save windows users from remembering large numbers of keyboard shortcuts. From the overlay, if the letter “I” (Open Settings) is pressed, the Setting Windows will open. Type Clipboard in the settings search box then press enter and the clipboard settings window opens. George demonstrated this technique to show an alternate way to get to settings and to highlight some clipboard features.
The first item in the Clipboard settings window is Clipboard history, a setting George highly recommends members turning on. With Clipboard history turned on, all items copied during the current windows session are sent to the clipboard. To display the clipboard history, press the keyboard shortcut WinKey + V to bring up a list of all items copied to the clipboard. (This shortcut should be easy to remember because it’s similar to the paste shortcut Ctrl + V). From here select the clipboard item you want from the list to paste it into your open document. All text, HTML, and images less than 4 MB in size can be stored in the clipboard. Larger items won’t be stored in history. Clipboard history stores a maximum of 25 entries, with the oldest items disappearing as new ones appear. Clips can be pinned to the list which remains in history when the computer is next booted. George then used Clipboard history to demonstrate how to paste both images and text into a Word document.
Along with the overlay tool above, PowerToys has a number of other good tools, but also some very primitive ones in the early stages of their development. The next PowerToys tool George demonstrated was one that can rename multiple files with a single click. In Windows Explorer highlight multiple files then right-click on the highlighted area. This will open a context menu where all files in the selection can be renamed when PowerRename is selected from the list. George demonstrated this by renaming a group of images, then used undo to return files to their original names. Another PowerToys tool that’s also available in the context menu is Resize pictures. This was also demonstrated. George recommends looking at PowerToys as there are other tools that should be useful to members.
Where George lives, the Melbourne weather radar is not that reliable for picking up light rain. Instead of checking the Melbourne radar when planning to head off for a walk or bike ride, George checks local webcams in his area (Glen Waverley). George showed the view from 2 live webcams at the Moorabbin airport that he’s conveniently located on the bookmarks bar in Google Chrome. Search for local webcams in your local area and you may find some you can add as tabs or bookmarks in your browser.
Another area that’s had George’s interest of late is the current COVID-19 pandemic. Two websites that analyse data differently on the spread of the virus were viewed. The first https://ncov2019.live gives a live update of the world’s COVID-19 statistics. Statistics show both global and country data. The data is presented as tables that are easy to read with countries shown in rows and data for that country shown in columns. A selection of the main column headings are, confirmed cases, cases per million head of population, critical cases, deceased etc. in order running across the page. When selecting the column heading, countries are ranked in order, highest to lowest. When the “deceased” column header was selected, the USA moved to the top row having the highest current deaths at 195,245. Australian data is listed per state further down the table.
The second website viewed https://ourworldindata.org/coronavirus-data shows the coronavirus data in graphical form rather than in tables. There is an immense amount of world data available on numerous other topics on this website. George showed a number of webpages on various other topics from this site. The data is represented in graphical form with the ones viewed having an x-axis displaying time in years. Clicking on any time period on the x axis will update the graph to represent that time period. This site is one well worth investigating for the immense amount of interesting data available.
The next topic covered relates to a presentation George gave to East SIG about a year ago. That topic was how to dispose of your computer, particularly related to passwords stored in the browser. George recently discovered an item in the Windows Control Panel called Credential Manager that really concerned him. Selecting Credential Manager in Control Panel opens up 2 lists, Web Credentials, and Windows Credentials.
Under the Web Credentials heading is displayed websites that the user has visited that have stored passwords. When selecting a website from the list (Figure 14) the web address, login id, saved by Internet Explorer, and password is shown. Here the password is shown as a series of dots but can be displayed by clicking on “show”. A password is required to open show.
To investigate this further George opened Internet Explorer and deleted the password then rebooted his computer. When opening Web Credentials a second time it showed that the password was still listed, even though the password had been deleted. That was a nasty surprise to George that you can wipe your internet data from the browser, but Credential Manager still displays ones log in data including your passwords.
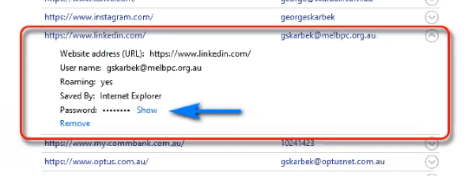
Figure 14 – Credential Manager
Finally George finished his talk with a short look at “What’s New”. A brief summary of the items presented included:
- The World’s biggest sensor for a digital camera at 3,200 million megapixels, with a sensor 60 metres wide and taking 3 ½ years to make.
- Three new home cinema 4K projectors released by Sony featuring a laser light source. The cheapest costing around US$10k
- Support for Windows 10 release V1803 was due to run out this November. Due to the COVID-19 pandemic support has been extended to May next year. Version 1803 is now 2 ½ years old so George recommends updating now.
- (Tech Ed:V1803 reached end of support back in November last year. V1809 was to end in May this year but has been extended to November this year. V1903 support end in December this year. https://support.microsoft.com/en-us/help/13853/windows-lifecycle-fact-sheet)
- Some audience members noted that they have been unable to update their computers running V1803. Windows would attempt to update only to fail and rollback to the original version. George suggested obtaining an ISO file of a later version of Windows from Microsoft and run the ISO as an update. Running the ISO as an update would retain existing programs and data.