Foxtel Cancellation, Network Switch Failure and Lifetime Warranty
6th October 2022
Steve Stubberfield
This is my story about how cancelling our Foxtel subscription lead to a network switch failure and what is meant by life time warranty.
It all started when we decided to re-assess what subscription services we required. With so many different services now requiring monthly subscriptions it is almost impossible for the average person or family to afford all of them. So we sat down and discussed what we really needed, or more to the point, wanted. High on my wife’s priority list is watching tennis, while for me it is watching Sci-Fi or action movies or series.
For many years we have had Foxtel with an IQ2 box and a legacy package which included the sports pack at $96 per month. Last year Foxtel discontinued the On Demand feature for the IQ2 and more recently have advised that the IQ2 box would be phased out and cease to function, so this added a little more urgency to our decision. While we could have upgraded our Foxtel package (they did offer a better deal), we knew it wasn’t good value for us because there was hardly anything else we were watching on it other than the tennis and I also wasn’t keen on getting a satellite dish installed on the roof either. We have also had Netflix for several years and, more recently, my sister pays part of the subscription to upgrade to premium.
The decision we made was to cancel Foxtel and, with the money saved from that, sign up to various other services, starting with Kayo and Stan, and then to look at adding others like Binge, Disney and Amazon Prime. Even with all of those, we will be slightly better off. So, in January we signed up for Stan (for the Aus Open) and then in February we signed up for Kayo and cancelled Foxtel. Of course there’s always the option to start or stop these services any time as required and we may not add them all immediately. In fact we added on Stan Sport just for January which is $10 extra and we will do it again three more times in the year for the other Grand Slam tournaments. We also have the option to log in to Foxtel Go using my Dad’s account if there was something in particular that we really wanted to see on Foxtel. At the time of writing, my calculations were as follows:
Existing: Foxtel + Netflix
$96 + $17 = $113 per month
New: Netflix + Stan + Stan Sport* + Binge + Kayo + Disney + Amazon
$17 + $14 + $3.33 + $14 + $25 + $12 + $7 = $92.33
(*Stan Sport is calculated as $10 per month x 4 months, as mentioned above. This averages to $2.33 per month over the year. Note also that prices for some services are priced at just under the dollar, like $16.99, and these have been rounded up to the nearest dollar for simplicity).
So that’s a saving of over $20 per month and, in my opinion, the viewing choices gained, outweighs the choices lost from Foxtel. There are also additional discounts to be had over the first year, such as $7.50/m for Kayo and $2.33/m for Binge if you have a Herald Sun digital subscription, and $2/m for Disney and $2.08/m for Amazon if you pay yearly. This adds up to an additional saving of almost $14/m for the 1st year.
No doubt these changes will increase the load on our internet connection. With four users in the household using the internet, we had noticed our usage slowly trending upwards over the years. Our son moved out of home last year, thereby reducing the usage, but this has been offset by the increase in HD and 4K content, so the upward trend has continued. We currently have a 100Mbps 500GB plan and, for the first time, we received an 80% usage warning in January (mainly due to the Aus Open). However, if required, we can easily make that unlimited for an additional $4 per month and still be in front.
So the next step was to remove the IQ2 box. This was the first step leading up to the switch failure. To put you in the picture, we have a primary (premium?) viewing location, the Rumpus room (See Photo 1), and a secondary viewing location, the Lounge room (See Photo 2). Both locations have a low-line entertainment cabinet, a Samsung Smart TV, a Blu-ray player and an AV Receiver. The Rumpus room also has a CD player, an old Topfield Hard Drive Recorder and a more recent Beyonwiz recorder, whereas the Lounge room also had the Foxtel box and a Wii game console. Our home network consists of a network cabinet under the stairs containing a 24 port patch panel, a Hewlett Packard Procurve 1810G-24 network switch, an Arris NBN cable modem, a Billion 7800VDPX router, a Synology DS413 NAS, a video distribution module and various plug packs and power boards. The house is wired with Cat6 cable which connects all the ‘permanent’ devices while all the portable devices connect via WiFi. Just as an aside, I have a new Synology DS920 NAS and I’m in the process of changing over from old to new.
After removing the Foxtel box, we decided to relocate the old Topfield HDR to the Lounge to fill the void in the cabinet. The lounge only has two network ports and we originally needed four devices connected so I had placed an old ADSL 1 modem/router under the cabinet and configured it in bridge mode to use as a switch. Since the Blu-ray player is rather old and is no longer upgradeable, there’s no need for it to be connected anymore and with the Foxtel box gone, the ports needed came down to two but then went up again to three by adding in the Topfield HDR. We decided the Wii console could remain disconnected and be swapped over with the HDR when we needed it. This allowed the router, plug pack, power board and several cables to be removed, thereby removing some of the clutter under the cabinet.
After removing the Topfield box from the Rumpus room there was some reconfiguring required there too, as well as some overdue dust removal! This then lead to some further changes in the network cabinet and I thought, while I was at it, I might as well tackle another change I had in mind for some time regarding the power to the cabinet. There was also the previously mentioned new NAS to accommodate.
The network cabinet is a rather typical 12RU metal cabinet with a Perspex front door (See photo 3). It has no holes in it other than ventilation slots and a large opening in the back panel. It is mounted on an internal plaster wall in a cupboard under the stairs and there is a large cut-out in the plaster to match the cabinet back panel. All the cables – network, video, antenna, Foxtel – come to this point from under the floor or through the ceiling space. See photos 4 & 5 for before and after views of the bottom.
When the cabinet was installed there was a problem with getting power into it. About half a meter above the cabinet there is a double power point but I didn’t want to have a lead dangling down over the front of the cabinet which would prevent the door from being closed and I didn’t want to drill a large hole in the cabinet for a power lead. My solution was to drill a very small hole in the plaster immediately above the cabinet just out of eye sight and just big enough for a power lead (not the plug). I then placed a four gang switched power board in the cabinet, cut off the three pin plug, fed the lead up the wall cavity and through the small hole, fitted a new three pin plug and plugged it into the power point. I was never entirely happy with this arrangement because it was not easily changed and I had to have additional power boards plugged into the first one because of plug packs being too wide and blocking the point next to it.
I realised recently that I had a spare low profile power point that would fit neatly on the back panel of the cabinet between the opening and the top panel. So I hatched a plan to remove the power boards, drill holes in the back of the cabinet and through the plaster to accommodate the switch and then connect the switch to the power point above. Due to a nogging in the wall cavity, space was tight so drilling accurately was critical with only a millimetre to spare either side. This also involved a specially shaped block of timber with pre-drilled holes that needed to be manipulated into the wall cavity above the nogging to accommodate the power point screws because there was no way of using a traditional power point plaster mounting bracket. I ended up creating a 3D model using Sketchup and printed out a drilling template. See photo 6 for the new power point.
Part of the plan was to install a new multi-gang power board and I wanted to mount it to the rack so that it was out of the way. There are numerous models designed for this purpose but they are all rather expensive. I eventually found a six gang non-rack type for only $8 at K-Mart and it had three wide spacings to accommodate plug packs. In order to mount it to the rack, I first mounted it to a piece of timber and then mounted the timber to the rack. I could have used aluminium but that was more difficult. See photo 7.
In order to carry out the modifications, I needed to power down, disconnect and remove all the devices and also lower the patch panel out of the way. I then used the template to mark out the holes and began drilling. Next I had to manipulate the specially shaped backing block into place in the wall cavity. I can’t even begin to describe how tricky that was but it worked perfectly in the end. Once completed, I began to put everything back together and after reinstalling the network switch, I powered it up. That was when everything ground to a halt.
The network switch fault light illuminated and was associated with a high pitched whine and it failed to boot up. My guess was that the power supply had a problem. My first thoughts were what I could do to get some things working. I had three spare ports on the Billion Router, so I patched in my PC, my wife’s PC and the NAS. I then realised that I could also daisy chain the aforementioned ADSL 1 Router to gain another two ports and get the printer connected. The Billion Router is also the WiFi hotspot so all the portable devices were ok and I was able to change over the security cameras and TV’s to Wi-Fi. Everything else had to wait.
The next issue was to fix or replace the network switch. I did think about opening it up, thinking it would most likely be a blown capacitor but I didn’t want to do that because the unit supposedly had a lifetime warranty. So I jumped on the HP web site and entered the serial number for a warranty check but it didn’t find it, however the model was specifically listed as having a lifetime warranty. Hewlett Packard has apparently split into HP for consumer products and HPE for enterprise level devices. My device is apparently classified as an enterprise level device. I had trouble finding what to do for servicing on the HPE website because it was geared towards businesses that would already have their products registered, which I didn’t. I noticed that the site language was set to US English and didn’t think much of it. On a whim I clicked on the list and it had an option for Australian English, so I selected it, and then an Australian oriented page appeared with an Australian contact number. I didn’t expect that, English is English, right?
So I called the number which was automated with specific options and voice recognition. All I had to do was say “network switch”, and then “Procurve”, and then the call was transferred and a woman with an American accent answered (in California). I told her my problem and she took my details but then she said that my email address was not a company address. I told her that I was not a company but I have the original purchase receipt from July 2012 (yes, just short of ten years ago!). So she sent me an email and asked me to reply with a copy of the receipt and she waited while I did so. She then had to check with a supervisor and then told me they would progress my case and hand me over to someone else to go through the fault details. The second person asked me for more details about what happened leading up to the problem and then told me she would progress my case further and the call came to an end.
About half an hour later I got an email requesting a photograph of the unit showing its serial number, which I also complied with. About an hour and a half later I received another email stating that my case would be proceeding. Then twenty minutes later another email stating a replacement “part” was being sent, the “part” being a complete unit. Another email followed with tracking information and instructions. Three days later the part was on my doorstep! That was exceptionally good, considering it came from Homebush in the middle of the floods. The package had instructions to put the old unit in the same packaging as the replacement unit, put on an address label that they provided and let them know when it was ready for collection. They then arranged for a courier to come and collect it. Three days later the old part was gone!
There was a slight hiccup with installation because I couldn’t find a saved config file which meant I had to do it all again manually. Since it’s a semi managed switch, it’s not plug and play, so it has to be plugged directly into a PC to be configured initially. Anyway, it’s now installed and configured and my network is back to normal. I should point out that the replacement unit was a refurbished one since that model is not in production any more, but I think that’s perfectly reasonable. I have no idea why it failed, but this was the first time since it was installed that the power cord was removed and there seemed to be a bit of movement of the power socket on the case. Maybe that physically disturbed something. By the way, in case you’re wondering about wiring the power point, one of my mates is licensed to carry out electrical work.
So there you have it. I hope you found this interesting. Perhaps it is time to do your own review of streaming services. And if you have a HP network switch with a lifetime warranty, make sure you keep that receipt!
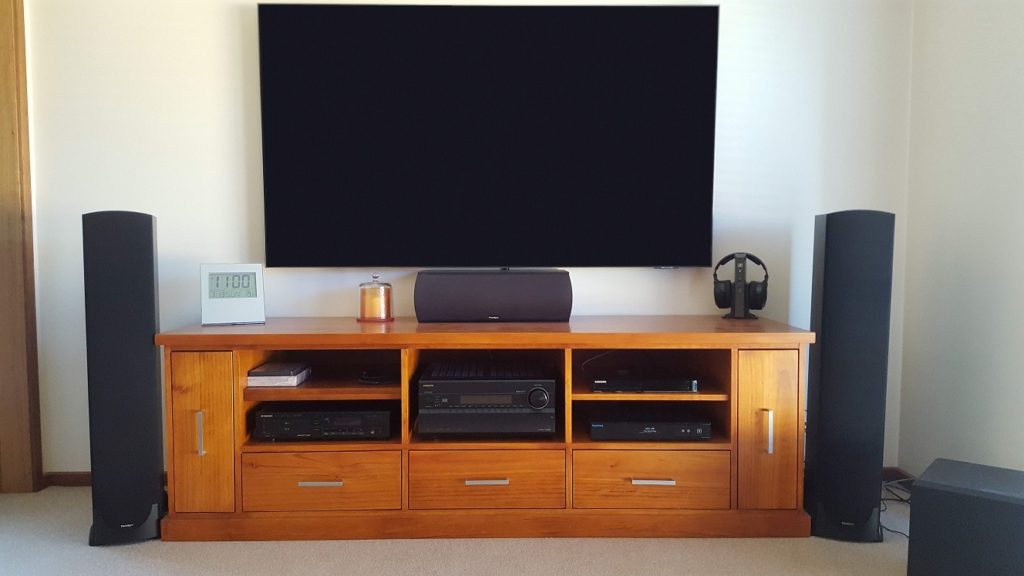
Photo 1: The Rumpus room setup with 75” TV.
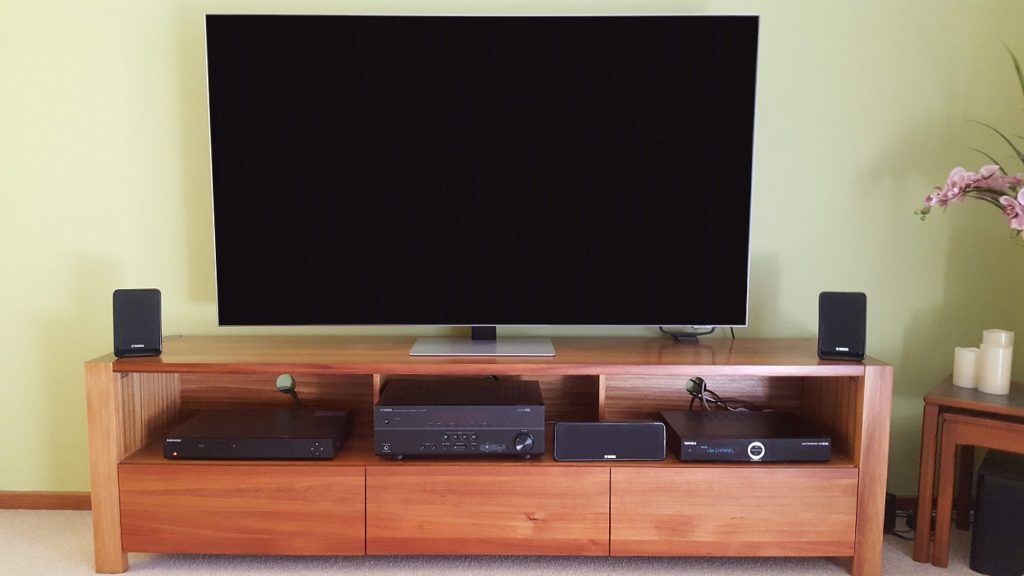
Photo 2: The Lounge room setup with 65” TV.
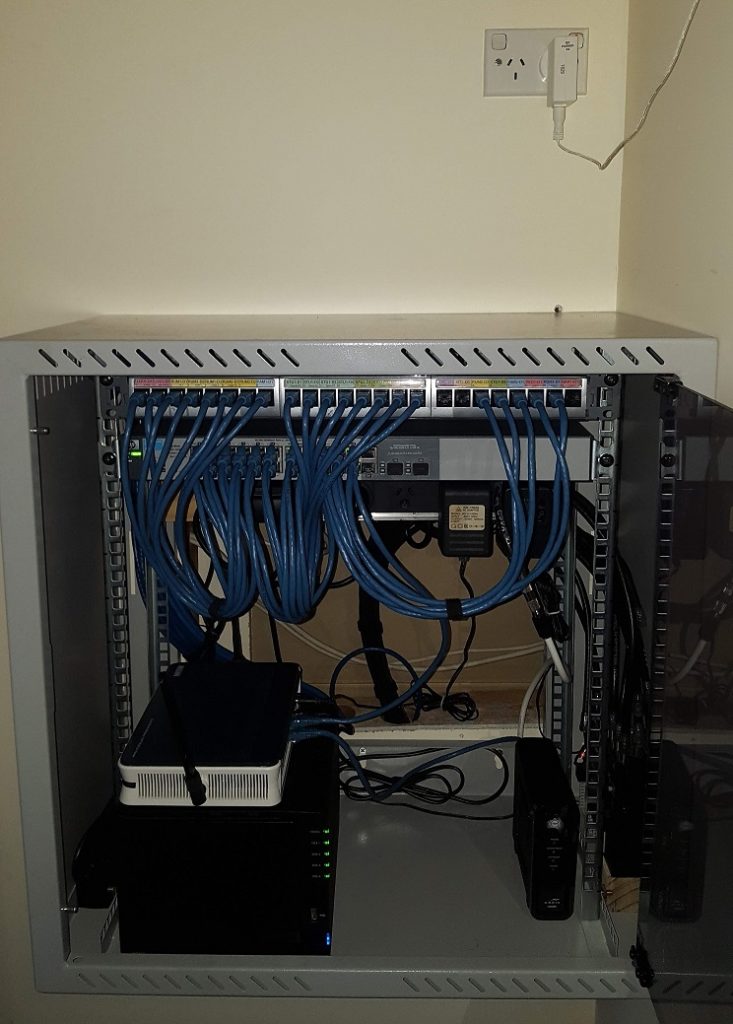
Photo 3: The whole cabinet. Note the small hole in the plaster above where the old power cable emerged.

Photo 4: Bottom of cabinet showing the old power boards. You can also see the video distribution unit.

Photo 5: Bottom of cabinet with the old power boards removed, thereby freeing up some space. You can see the Synology NAS on the left with the Billion Router on top and the Arris NBN modem to the right.
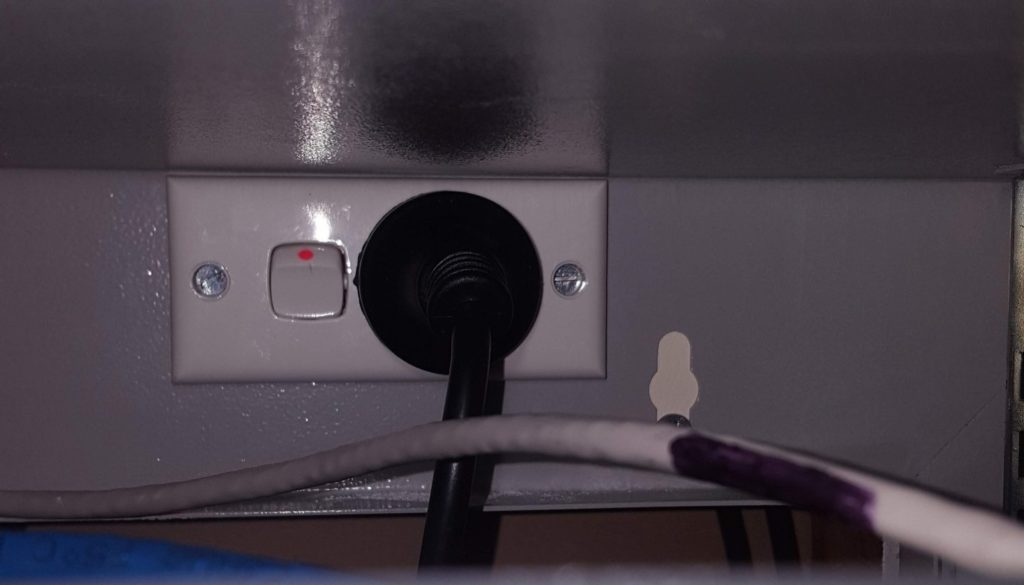
Photo 6: The new slim line power point installed on the back panel. There is a nogging behind it that covers from the bottom lip of the panel to just below the switch mechanism, hence the need for accuracy.
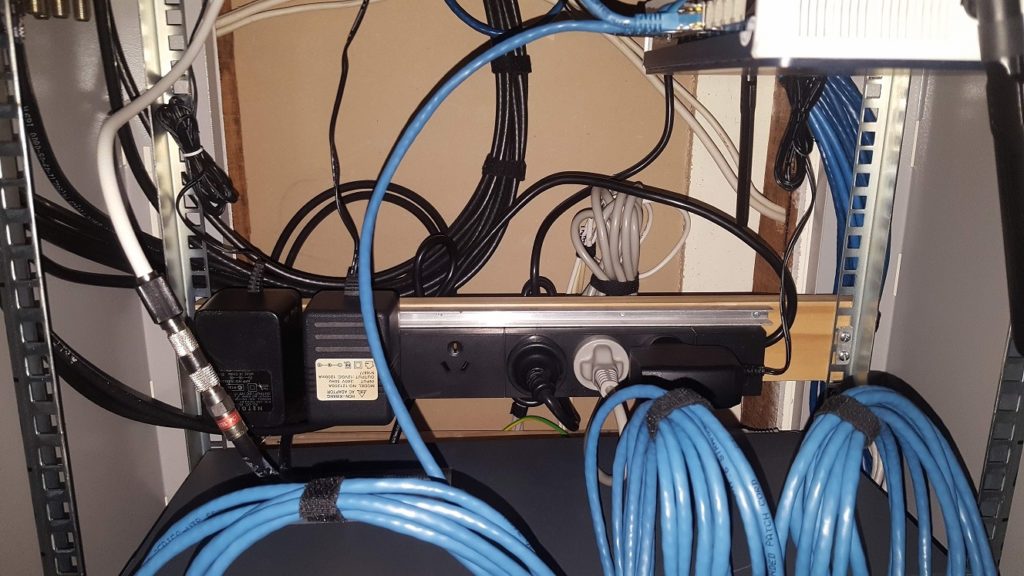
Photo 7: The new power board mounted on a piece of timber. Despite the wider spacing for plug packs on the right, due to the stupid design of one of them it still doesn’t fit there and had to go on the far left.